The iPad Gamevice has long been my favorite MFi controller. Ever since I used an early prototype of the iPad Mini model, I’ve been convinced that the Gamevice is the best way to play iOS games. If you’ve seen my review of the smaller Gamevice, you know the general gist of what I’m going to say here. I love the form-factor, the build quality is excellent, and the price – while high – is reasonable for the quality of the product. The question with this larger device is simple: does the Gamevice form-factor still work on a big-screen iPad?
Unlike its predecessors, the 12.9-inch iPad is large enough to be comfortably used on a table, like a small TV, and controlled with a wireless Bluetooth controller. Some gamers might prefer this, but I’m not one of them. To me, this play style fails to take advantage of what the iPad has to offer as a gaming device – it turns the iPad into a (rather tiny) Apple TV. The beauty of the iPad has always been in the way you can hold it in your hands and directly control what is happening. There’s an intimacy to iPad gaming – it is fundamentally different than console and PC gaming, and you lose this intimacy when you use a traditional Bluetooth controller with your iPad.
The Gamevice is different from other iOS controllers. It embraces everything great about the iPad, rather than trying to turn the iPad into something it was never meant to be. And unlike with the iPhone Gamevice, the design and build quality of this iPad Gamevice model is excellent.
The Details
D-Pad
When the iPad Mini Gamevice launched two years ago, it had a better d-pad than every other MFi controller – by leaps and bounds. Amongst a sea of mushy circular d-pads, the Gamevice launched with a responsive, plus-shaped design. The competition has improved since then. The PXN Speedy, Horipad (regular and Ultimate), and SteelSeries Nimbus all have better d-pads than any of the Gamevice’s old competitors. Many of them even feature plus-shaped d-pads.
Because the original Gamevice was so far ahead in its original design, it still holds up against its new competitors. It isn’t quite as nice as the d-pad on the new Horipad Ultimate, but it’s a close second. The size is perfect, the texture is pleasantly grippy, and it is calibrated well enough to prevent accidental diagonal movements, without making these movements too difficult. If I’m nitpicking, it is a bit stiffer than I’d like – you have to press a bit harder than you should to activate it, which is why I’d rank the Horipad Ultimate’s d-pad a little higher. But overall, this is a great d-pad, and fans of retro games should be happy with the Gamevice.
The new Gamevice - same design as the Mini model, but with a far larger screen
Analog Sticks
The shape and feel of the Gamevice’s analog sticks feel like they’ve been lifted straight from an Xbox One controller; that’s a good thing, because the Xbox One controller has great analog sticks. And because the Gamevice is a Lightning-connected controller, its analog sticks communicate with the iPad at a much faster rate than older Bluetooth controllers, meaning they are potentially more responsive to quick motions.
Some early-production-run 9.7-inch iPad Gamevices suffered from major calibration issues, leading to significant analog stick dead zones. In short, you had to push the analog sticks noticeably far before they start registering movement, and the analog sticks think they’ve reached the end of their range well before they’ve actually been pushed all the way to the edge. Deadzones can cause issues in any game that requires responsive, precise motion. Because there’s a buffer between when your thumbs start moving and when the controller starts reacting to your thumbs’ movement, it can often feel like what’s happening on screen isn’t corresponding to what you’re doing on the controller. Camera movement that is supposed to be gradual instead feels sudden. Characters move in octagonal patterns instead of fluid, 360-degree motions.
This 12.9-inch Gamevice model is significantly improved from its predecessor, but not as much as I was hoping. Things have gone from terrible to adequate. It has the worst deadzones of the three modern MFi controllers, by far. The people at Gamevice have known about this problem for over half a year, and have been in direct contact with me throughout the prototype phase. I was hoping that this problem would be resolved. As it stands, the deadzones on this Gamevice don’t ruin the controller, but they are well behind those of the SteelSeries Nimbus and the Horipad Ultimate.
The ABXY Buttons
The Gamevice’s ABXY buttons have the exact same same size, shape, texture, and layout as an Xbox controller – medium-sized buttons, generously spaced away from each other, with a convex outer surface. These buttons are unchanged from the previous iPad Gamevice models, and thats a good thing, because they’re pretty much perfect.
The three-dimensional ABXY buttons on the SteelSeries Nimbus look a bit cooler, and are a bit larger, but the more generous spacing between the Gamevice’s buttons make for a better playing experience.
In my experience, the games that make the most demanding use of the ABXY buttons are button-combo-based games like Tekken and Tony Hawk’s Pro Skater. I spent time playing both of those via emulation, and no matter how intricate the button presses, the Gamevice never missed a beat. These buttons are first-rate.
Gamevice makes certain console ports playable on iOS
Triggers and Shoulder Buttons
Poor-quality triggers have ruined multiple MFi controllers. Thankfully, the triggers on the iPad Gamevice are excellent. They’ve been excellent ever since the very first iPad Mini model, and they’re still top-quality. The texture is grippy, the sensitivity is perfect – nothing to complain about here!
The shoulder buttons are similarly solid. They’re a bit more recessed than I’d like, requiring you to strain your fingers just a little bit more than would be ideal. But this is just nitpicking – considering how badly some of the other controllers dropped the ball with their shoulder buttons and triggers, the Gamevice deserves credit for getting this right.
Charging, Power, and Sound
The biggest upgrade to this 12.9-inch iPad Gamevice is something you can’t see – way it manages power has been completely redesigned. Previous Gamevice hardware included dedicated batteries. These batteries didn’t supply power to the iPad, nor could the Gamevice draw power from the iPad once its integrated battery died. This never made sense to me, and I couldn’t get a straight answer from anyone about what the logic behind this was. Anyways, it’s gone now – the 12.9-inch Gamevice draws power directly from the iPad. That means no more keeping track of its battery life – when your iPad dies, your Gamevice dies; until then, game on.
In addition to removing the superfluous battery, this Gamevice finally ditches the Micro USB input, in favor of a female Lightning port. This is an extremely welcome addition – no more extra cable required to charge the controller! When you’re running low on power, you don’t have to remove your iPad from the Gamevice – just plug it in to your standard Lightning cable, and keep playing as long as you want.
Lightning replaces Micro USB, but no headphone port
One caveat: the Gamevice is only capable of passing through 12W of power to the iPad Pro from its Lightning connection. This is not enough to actually charge the 12.9-inch iPad Pro while playing performance-intensive games – merely enough to tread water. Apple solved this problem by releasing a 29W USB-C power charger and cable. Unfortunately, the Gamevice doesn’t take advantage of this high power charger, and instead caps the input to a maximum o 12W. I can’t think of any non-Apple devices capable of charging the 12.9-inch iPad Pro at full speed, so I think this is probably a restriction of the MFi program, rather than something to blame Gamevice for.
Lastly, the Gamevice’s dedicated headphone jack is gone. It wouldn’t have made sense on this model, because the Gamevice doesn’t block the 12.9-inch iPad Pro’s headphone port. But who knows what the future holds? If future iPad Pro devices ship without a headphone port, the makers of the Gamevice might regret omitting one. Apple’s new Lightning EarPods do not work with the Gamevice’s Lightning port, so if Apple decides to ditch the headphone jack on future iPads, Bluetooth headphones will be your only option.
Gamevice Live
I rarely spend much time talking about controller software in my MFi controller reviews, because the software is rarely worth talking about. However, Gamevice Live is worth discussing in more detail, because it is more ambitious than software from other controller makers.
The Gamevice Live app (much like this website) is designed to be an interface for finding controller-compatible iOS games. It acts like a mini-App-Store, complete with featured app banners at the top, and genre-sorted sections for browsing catalogued games. Select a game, and the app shows you its iTunes description, price, and (for popular games) a map of the game’s controls.
Full disclosure: the Gamevice Live app is technically a competitor to my site. Although they paid me a lump sum over a year ago for one-time access to the AfterPad Game Database, I no longer have any ties to their app. Every game downloaded through the Gamevice Live app is a commission I don’t make on AfterPad. This is different than apps from other companies, where AfterPad supplies data directly to the apps, and I get a commission on app sales. I do, however, like the Gamevice, and I know and like the people behind the product. If you have any doubts about my ability to be objective, take the following with a grain of salt.
In my objective-as-possible opinion, the Gamevice Live app is a mess. Right of the bat, it isn’t optimized for the 12.9-inch iPad’s screen, resulting in blurry text and oddly sized graphics. This makes no sense when you consider that it merely a web view containing the Gamevice Live website – a website that scales perfectly fine to the 12.9-inch iPad Pro’s screen.
Even forgiving the blurry interface, the app doesn’t feel like it belongs on iOS. Scrolling is jerky and lacks rubber-banding, button presses are laggy and offer no visual feedback, there’s a hamburger menu at the top right that merely acts as a second way of loading the All Games screen, many of the graphics aren’t optimized for Retina, the list of genres includes a bunch of non-English entries… the list goes on and on.
It gets worse: every time you connect your Gamevice, it displays a pop-up notification prompting you to install the Gamevice Live app. If you already do have the Gamevice Live app installed, it will prompt you to launch the app. Worst of all: if you leave your iPad connected to your Gamevice, you will receive a push notification every 5-10 minutes asking you to launch the Gamevice Live app. It is impossible to disable these notifications. The only way to make the notifications go away is to uninstall the Gamevice Live app.
If you still want to use Gamevice Live after this, you should save the Gamevice Live website to your bookmarks or home screen, instead of using the app. The website is the exact same thing, but without the incessant pop-ups, and with support for the iPad Pro’s screen support. Personally, I’ll be sticking with my own site instead – although I probably should borrow their idea of listing detailed control layouts for popular games.
The Gamevice - my personal favorite way to play
Final Thoughts
If holding your iPad and controller in your lap while you game appeals to you, the 12.9-inch iPad Gamevice is an excellent controller – one of the best on the market. In every regard except the analog sticks and the app, the 12.9-inch iPad Gamevice is first rate. The analog sticks aren’t that bad, and nobody buys a controller for the companion app.
If the form factor of the Gamevice appeals to you, buy it. The polish of the product and the quality of the gaming experience is well worth the price.
The Game of the Month Award is given to my favorite game from the past month, as governed by the following criteria:
It has to be a great game (of course)
It has to have well-implemented controller support
It has to have a fair business model that is appropriate to the game
It doesn’t need iCloud, Game Center, or universal device support, but it helps
It has to either be released this month, or updated for controller support this month
That last point needs clarification. One thing I’ve consistently heard from gamers with MFi controllers: they almost exclusively purchase games that feature controller support. This means that many MFi gamers might have ignored a potentially great game on its release, due to lack of controller support. For this reason, when a game gets updated with controller support, it might as well be a new game. Because of this, the Game of the Month award might be given to a game that was originally released in an entirely different year.
Lastly, separate Game of the Month awards may be given for iPhone, iPad and Apple TV. A great universal game might sweep the awards, but sometimes different versions of a game might not meet every qualification for an award (I.E. the Apple TV version of a game might have controller support while an iOS version does not, or an Apple TV port of a game might arrive at a completely different time than the iOS version, or a universal game might run far better on iOS than it does on Apple TV).
With that out of the way, the first ever AfterPad Game of the Month award goes to…
Game of the Month: Momoka – An Interplanetary Journey
Momoka is an easy choice for Game of the Month: it’s an outstanding game. It hits all the right notes – classic gameplay, presentation oozing with personality, the perfect degree of challenge, great graphics, smooth performance, and a feeling that it was tailor-made – with love – for iOS.
Momoka is an adventure game, equal parts platforming and exploration. There’s a healthy dose of combat thrown in, but the emphasis is more on navigating the environment’s puzzles and platforms than it is on shooting. Like the best platformers, enemies are placed in such a way that they’re just another part of the platforming puzzle for you to navigate.
Momoka employs a relatively unique, visually stunning trick for its world design, and one that fits nicely with the game’s narrative: the planets you’re hopping to and from each have their own centers of gravity. A side effect of this is that the themselves are circular, wrapping around the center of the planet. This allows for a different take on level design – you’ll often find yourself wrapping back around the planet, zig-zagging downwards towards an objective at the planet’s core. You’ll even find yourself jumping from one planet from another, trying to avoid dizziness as you rapidly shift from one gravitational center to another.
This sort of “2D Super Mario Galaxy” style of gameplay had previously been explored in Soosiz, another iOS classic. Its hard not to draw comparisons between the two, but Momoka is very much it’s own game – the similarities are superficial. You’ll find similarities to other games, too, though I won’t spoil specifics. That’s okay – Momoka never feels like it’s ripping off other games. It takes ideas you’ve seen before, but spins these ideas in unique ways.
There’s a loose story here, and it fits nicely with its gameplay: you’re a girl named Momoka on a quest to save the world. Your galaxy’s sun is dying; nobody knows how to fix it, but you need to take your rocket ship out on a journey from planet to planet, looking for a way to (literally) save the day. This storyline almost feels like something you’d expect to find in a Final Fantasy game; I doubt that’s an accident. Much like the classic Final Fantasy games, Momoka has a way of opening up the world map as you play, making an area that you previously thought was the limit of the game instead feel like a tiny part of the universe.
Momoka’s few boss fights evoke the classic action-platformers of the ’80s and ’90s: bosses have a pattern you need to figure out, and you’ll need to time your attacks perfectly to dodge bullets and hit the boss in its weak spot. You will die on some of them, repeatedly, but these boss fights never feel unfair, and your checkpoints are never too far away.
Momoka takes advantage of another time-honored platformer tradition: much like the classic Metroid / Castlevania style games, Momoka likes to tease you by showing you collectables in areas you just can’t quite reach yet. You’ll find yourself revisiting earlier stages after you collect new items and abilities to 100% the game, easily blowing through enemies and traps that previously posed a challenge – always a nice feeling! More than that, it helps give you a bit more to do in an otherwise short game.
About 1/3 of the way through, Momoka presents you with a goal to collect 3 specific items on three planets; the order in which you tackle that job is up to you. I wish more games approached stage selection in this way – it helps an otherwise linear game feel more open.
Momoka supports all MFi controllers on both iOS and Apple TV – obvious since its on this list. Still, support isn’t perfect. You can only use the d-pad to move, which is less than ideal for those with certain MFi controllers. You can use either the X button or the right shoulder button to fire your gun, but for whatever reason, there is a bug with using the X button: after you unlock the grenade launcher, pressing X while jumping will also accidentally fire a grenade. The good news is, using the shoulder button or B instead of X doesn’t exhibit this bug. The fact that, even after this bug, I still picked Momoka as my Game of the Month, should tell you how great this game is.
There is only one criticism I can level at Momoka: I wish there was more of it. I managed to get 100% in about 6 hours, and I was still hungry. Don’t let that dissuade you – I enjoyed every minute of this game, and I’ll enjoy it again on my next play-through. If you like platforming games, this is the best $6.99 you can spend this month.
Venture Kid provides a fascinating contrast with Momoka. Both games are love-letters to classic ’80s and ’80s platformers. Both games have superficially-similar gameplay mechanics. Both have Mega-Man-style guns. They even have similar level designs. But whereas Momoka brings innovative new remixes to the classic platforming fundamentals, Venture Kid instead looks backwards, sticking close to the formula of the games it references.
Lets get this out of the way right now: when I say Venture Kid sticks close to the Mega Man blueprint, what I mean is, if you swapped Mega Man’s graphics over the titular main character, this could be an NES Mega Man game. There is absolutely nothing original here. That’s okay – this isn’t trying to break new ground. Venture Kid is 100% focused on feeling like a classic platformer that could have existed on the NES.
Some people really seem to hate how close this feels to an NES Mega Man. They aren’t the target audience for this game. The target audience for Venture Kid is Mega Man fans with a strong sense of nostalgia for the NES. This audience has been poorly served by the official iOS Mega Man games, which are not the best ports. Venture Kid is the best Mega Man experience you can get on iOS. It runs vastly better than any of the official Mega Man games, which suffer from emulation issues. The price is low, with optional in-app purchases for coin doubling. Controller support is solid – I’d go so far as to say essential, actually, as the game is vastly more frustrating with touch controls.
A certain subset of gamer will find Venture Kid extremely cool, specifically because of how closely it sticks to the ’80s Mega Man formula. Myself, I’m conflicted – I think the best NES games hold up in spite of their technological limitations, not because of them. Game design has advanced in so many meaningful ways since Mega Man was released, and Venture Kid prides itself on ignoring most of those advances. This stands in stark contrast from Momoka, which takes some of the best elements of classic platformers and evolves them in meaningful ways, contributing its own identity to the history of the genre. For this reason, Momoka gets the nod for Game of the Month. But a more traditionalist platforming fan might prefer the way Venture Kid sticks to the Mega Man script.
Ultimately, both of these are outstanding games. If you want to play a brand new NES Mega Man – with all the strengths and limitations that entails – tailor-made to run well with an MFi controller on iOS, you should buy Venture Kid immediately.
Anandtech has, at long last, posted their review of the iPad Pro. As usual, Anandtech’s review is incredibly detailed, and full of exhaustive performance benchmarks, use testing, and direct comparisons with competing products.
It was fascinating to see just how far Apple’s processor design skills have come in the past few years. The A9X doesn’t quite beat competing Intel designs, but it’s a stone’s throw away.
Ahh, the Horipad Ultimate. The word “Ultimate” is a synonym for “final”. It implies Hori thinks this is the last controller they’ll ever need to make, and the last controller you’d ever need to buy. I hope this isn’t the case – Hori needs to try a third time. The Horipad Ultimate is a perfectly good controller, but a few baffling flaws keep it from dethroning the current champion.
Many people on Twitter have been bugging me to finish this review. The fact of the matter is, this was a particularly hard review to write. Objectively speaking, there are serious problems with this controller, all of which should have been corrected. But subjectively, I like this controller. I’ve been using it consistantly to play through GTA; I keep going back to it. Maybe its the old PlayStation gamer in me coming out, but I like this controller.
Design
Let’s start with the best things first. Hori deserves serious praise for the design of this controller. It is an objectively beautiful controller – a premium-quality matte black plastic body, with matte bluish-graphite handles, and a glossy black mid section. It works – it looks and feels like a high quality product.
This is especially notable next to the original Horipad. I loved that controller, but lets be honest – it was hideous. The glossy plastic body and shiny faux-metal analog stick podium made it look like a cheap third-party knock-off controller. The build quality was outstanding – the highest quality of any MFi controller at the time – but the looks sold it short.
With the Horipad Ultimate, Hori finally has a controller that looks as good as it feels. I prefer the look of the SteelSeries Nimbus – it still looks more “premium” than the Hori option – but Hori made massive strides in this direction.
The Details
The D-Pad
Among fighting game aficionados, Hori is famous for their d-pads. The previous Horipad had one of the best circular d-pads of any controller I’ve ever used. This new Horipad has a superior ‘plus’ shape. I had (justifiably) high expectations for this d-pad. It delivers – the Horipad Ultimate has the best d-pad of any MFi controller.
This d-pad is responsive, it has a perfect shape, it isn’t sized too large or too small – it’s about as good as you could hope for. For retro games, side-scrollers, and emulators, this d-pad single-handedly makes the Horipad Ultimate the best controller you can get. Within the confines of the MFi standard, it’s hard to imagine any way to improve things. It took a long time (and a lot of terrible examples), but the d-pad is finally a solved problem for MFi controllers; other companies should pay close attention to what Hori has done.
The ABXY Buttons
The Horipad Ultimate prides itself on being a gamer’s controller, and the ABXY buttons don’t let it down here. They are very traditional, highly responsive, PlayStation-style designs that should appeal greatly to hardcore gamers. The matte surface, wide spacing, higher profile, and less rounded surface make for buttons that are highly responsive, if a bit less comfortable than the Nimbus.
The double-shot plastic construction looks fine, but again, is less impressive than the embossed 3D buttons on the Nimbus. It is indicative of a trend with the Horipad vs the Nimbus – the Nimbus looks better, but the Horipad is more responsive for the hardest of hardcore gamers.
The Analog Sticks
The analog sticks on the Horipad Ultimate are perfectly adequate, but disappointing compared to both the competition and to Hori’s previous products. On the plus side, the upgraded Bluetooth implementation means these sticks are extremely responsive. The problem with the feel of the analog sticks themselves: the surface has little grip to it. No Xbox-One-style ridges, no PlayStation-style texture, no Xbox-360-style indentations. Just a solid piece of rounded, lightly concave rubber. It’s not the end of the world, especially for people who primarily press their thumbs against the edges of the analog stick, but it is a downgrade.
Controller makers are supposed to learn from their mistakes, and keep iterating towards perfection. The analog sticks on the previous Horipad are objectively better than these “ultimate” sticks, and they weren’t even the best options available at the time. Now that the Gamevice and Nimbus have leapfrogged the competition, Hori was supposed to up their game. Instead, they stepped slightly backwards. Again, these sticks aren’t bad, just… disappointing.
Triggers and Shoulder Buttons
Hori was so close to perfect with this controller. I can forgive the analog sticks, especially for a retro-focused controller. But then we come to the triggers. These triggers have a significant dead zone before your fingers encounter any resistance. For the first half of activation, it’s just loose plastic. When you finally reach the activation point, and the pressure starts abrubtly, leaving a short range until the triggers bottom out. In addition to feeling unpleasant and cheap, this design makes fine-grain motion difficult.
These triggers are especially irritating in light of the excellent R1 and L1 shoulder buttons – very PlayStation-esque designs, responsive and easy to activate. The previous Horipad had R2 and L2 shoulder buttons instead of triggers, and it would have been fine for Hori to do the same here. Great shoulder buttons beat bad triggers any day.
Other Buttons
I have to give special mention to the Horipad Ultimate’s menu / pause button. It is one of the more clever buttons I’ve seen on an MFi controller. It feels almost identical to the home buttons on the pre-TouchID devices – concave, about the size of your thumb, with a satisfying click. It may be the least important button on the controller, but they did a great job of it.
Turning on the controller involves toggling a slider switch on the back of the controller, same as the Nimbus. This is a nice upgrade from older controllers, which used a power button to turn on, making it unclear sometimes whether a controller was on or off.
Battery
The Horipad’s internal battery is rated for 80 hours – a huge amount, far larger than other MFi controllers. In the month or so I’ve been using this controller, the battery died once. Charging it was as simple as plugging it into one of the many Lightning cables I have set up around the house – no extra USB cables required here. This is how every MFi controller should work.
iPhone Grip
The Horipad Ultimate’s biggest weakness is its lack of an iPhone grip. That makes it a complete non-starter for iPhone owners. I will never, ever understand this. I cannot understand why controller makers don’t make grips for every iOS controller – iPhone owners make up well over 90% of the total iOS user base. Add in the 10 cents worth of plastic that makes up an iPhone grip, and the market for your controller is literally ten times larger.
Sadly, it doesn’t seem like you can even use a third-party controller grip with the Horipad Ultimate, either. The Nimbus works very well with a third-party Nyko grip, making it a great choice for iPhone gamers. Hori drops the ball on this, and takes itself out of contention.
Final Thoughts
The Horipad Ultimate is a difficult controller to summarize. The last Horipad was a great controller for the retro gaming niche, but this time, I was hoping Hori would finally bring make a great controller for the mainstream. Hori comes close, but not close enough. The SteelSeries Nimbus or PXN Speedy are still the best options for most gamers.
I can forgive the analog sticks here; they’re a big of a downgrade, but still good. I can forgive the lack of iPhone grip – it sucks for iPhone gamers, but it would still make this controller a good choice for iPad and Apple TV gamers. The relatively bad triggers seal the deal, though. Hori was probably right to switch from buttons to triggers – in 2016, more games are designed for triggers than are designed for shoulder buttons. They just needed to do a good job, and they didn’t even come close.
If you want the absolute best d-pad you can get on an MFi controller (and are willing to forgive the triggers), the Horipad Ultimate is a perfectly solid controller at a great price. It just isn’t as good as the Nimbus – that’s the problem. The Nimbus’ d-pad isn’t great, but it isn’t close to being as bad as the Horipad’s triggers. Combine that with the Nimbus’ superior analog sticks and general build quality, and you can see the problem Hori has. They made a perfectly good controller, but the competition improved further.
The Nimbus is objectively better than the Horipad Ultimate in several major ways, but if you do buy the Hori, you’ll be perfectly happy. Its a fine controller. If you’re a hardcore retro gamer, you’ll love it. But if not, you should probably stick with the Nimbus.
Two of the best MFi controllers so far, the SteelSeries Nimbus and Horipad Ultimate, are now available at a shockingly reasonable $49 price. The only problem: neither of these controllers have any way to attach an iPhone. The only recent iPhone-optimized controller, the iPhone Gamevice, was an unfortunate disappointment compared to the iPad model.
Well I have some potentially game-changing news for iPhone gamers. Thanks to a tip from one of my readers, I went ahead and bought a third-party grip – the Nyko Grip for Xbox One – to try with the SteelSeries Nimbus. And despite a few serious issues, it’s an excellent experience compared to the other options. At less than $10, it’s an essential buy for iPhone gamers with the Nimbus.
Let’s get the downsides out of the way first. Because I’m on vacation, I’ve only been able to test this clip with the Stratus XL, Horipad Ultimate, and Nimbus. Of those, it was only compatible with the Nimbus – the other controllers simply aren’t sized correctly for the clip.
Even the Nimbus didn’t work perfectly. The Pause / Menu button is completely inaccessible, and the rear pairing and power switches are difficult to reach. Still, the vast majority of MFi controller compatible games allow you to pause by pressing somewhere on the screen, so it isn’t that big of an issue.
Look past those issues, and you’ll find an excellent controller. This clip’s build quality is first rate. It’s sturdy – as sturdy as the clips designed for the Speedy and CTRLi controllers. The body of the clip is made from a high quality plastic, the adjustable thumbscrews are metal, and the bands used to attach the grip to the controller are thick rubber.
While this Nyko grip may not be compatible with many MFi controllers, it is compatible with pretty much any iOS device you’d want to use. Every iPhone works, with or without cases. Heck, it opens wide enough to support an iPad Mini, if you’re crazy like that.
The Nyko grip has one huge advantage over every other MFi controller’s grip: an adjustable angle which allows you to position your device anywhere from 90 degrees to perfectly flat. The controller grips officially designed for MFi controllers all hold the phone at much too steep of an angle for my taste, so in my view, this feature alone makes the Nyko clip a great choice.
For under $10, I have absolutely no reservations about recommending this. Even without the menu button, I’d rather use the Nimbus+grip combination than any other controller with a built-in grip. The Nimbus is simply a better controller than otherBluetoothcontrolleroptions (even thebestones), and as jankey as the Nyko grip is with the Nimbus, it still beats the “official” choices.
Amazon is full of other controller grips. Once the holidays are over, I’ll go through and test the best of them with each MFi controller. It’s possible one will wind up being better than this. Still, for $10, this is a great option, and I’ll be using the heck out of mine throughout the rest of the holidays.
When I wrote my review of the SteelSeries Stratus XL, I ended it with the following:
Iâm having trouble determining who the Stratus XL is for. iPhone gamers are excluded, and would be better served by the CTRLi, with itâs solid iPhone clip. Retro gamers who demand a perfect d-pad are excluded, and would be better served by the Horipad. Price-conscious gamers are excluded, and would be better served by the Micro CTRLi, which retails for $20-$30 less than this. Gamers who rest their fingers on the triggers are excluded, and would be better served by literally anything else.
One thing is for sure: I cannot wait to see the third Stratus SteelSeries makes. If it is as much improved over itâs predecessor as this controller is over the first Stratus, weâre in for a real treat.
To me, SteelSeries had two goals with their next controller, the Nimbus:
Fix the obvious design flaws, like the terrible d-pad and triggers
Design a controller that actually makes sense for a target demographic
With the Nimbus, SteelSeries has achieved both of those goals, and then some. The Nimbus is not merely a good controller. The Nimbus is an outstanding controller. In almost every way, the Nimbus leapfrogs every other MFi controller, and becomes the model to beat.
Similarly, the Nimbus has a defined target audience in mind: Apple TV gamers. The Nimbus works perfectly with iPhones and iPads, but for reasons I’ll get into throughout this review, it feels designed to go with the Apple TV even more than with these other devices.
SteelSeries has learned from their previous controllers. They’ve corrected the previous mistakes. They’ve included the latest technology. The results: the Nimbus is the best designed MFi controller ever made. It isn’t without flaws – I’ll get to those – but it represents the start of a new generation of controllers. The bar has been raised.
The Nimbus incorporates elements from Sony, Nintendo, and Microsoft controllers, but also features several touches that are distinctly SteelSeries. The analog sticks are pretty close to those of the Xbox one controller, though they’re laid out similarly to a PlayStation 4 controller. The D-Pad is reminiscent to (but worse than) Nintendo’s Wii U d-pad, thanks to an expired Nintendo patent and relaxed MFi controller standards. But the buttons, triggers, and industrial design have a uniquely SteelSeries identity.
The Details
The Analog Sticks
The analog sticks on the Nimbus are the best of any MFi controller. They’re reasonably sized, almost identical to those of an Xbox One controller. The sticks’ concave surface and rubberized ridges give them a pleasant amount of grip. Deadzone is minimal, and the amount of pressure required to activate the sticks feels perfect.
The sticks are positioned in a traditional, non-staggered layout – analog sticks parallel, positioned below the d-pad and ABXY face buttons. Xbox gamers might balk at the layout, but unless you feel strongly about it, you’re not going to find anything to complain about here.
The D-Pad
Good news: unlike every other SteelSeries controller, the d-pad on the Nimbus isn’t terrible. In most games, I’d go so far as to call it good.
Thanks to an expired Nintendo patent and relaxed MFi controller standard, controller makers are now able to use plus-shaped d-pads instead of circular pads. This is a mixed blessing. Plus-style pads make it much easier to avoid accidentally pressing diagonal inputs, but conversely, they can make it difficult to purposefully trigger diagonal inputs. This is the case with the Nimbus: it’s large, plus-style d-pad is wonderful for going along the standard axis – left, right, down, up – but anything in-between feels like a struggle.
The place where SteelSeries really dropped the ball with the d-pad is the size: it is way too large. One of the largest plus-style d-pads I’ve ever seen on a major controller. This large size is the chief reason why diagonal movement is difficult – side-scrollers and racing games work well, but not anything more complex than that. I can’t help but feel SteelSeries sized the d-pad for aesthetic concerns, rather than gameplay. This was a mistake – it’s the one big blemish on a controller that would otherwise be close to perfect.
The ABXY Buttons
The buttons on the Nimbus are pretty close to perfect. They’re large, pleasantly rounded, and beautifully designed. The plastic material is triple-shot – a transparent outer layer covers colored letters that are raised above a black base. It’s as beautiful here as it is on the Xbox One controller, where I first saw this style of button.
The Triggers and Shoulder Buttons
The triggers have, historically, been the Achilles heal for SteelSeries. The first Stratus sacrificed any semblance of quality triggers to keep the size down, resulting in 4 difficult-to-reach shoulder buttons. The Stratus XL switched to a modern trigger design, but botched the execution by using strings that were far too weak – resting your fingers on the triggers caused them to activate. I’d often find myself firing my gun accidentally, braking when I didn’t mean to – things I didn’t want to be doing.
The Nimbus corrects the problems from SteelSeries’ other controllers, and then some. These triggers activate with a perfect degree of pressure, yet feel smooth going in. Resting my fingers on the triggers had no negative side effects. Unlike other MFi controllers, they have a matte surface texture, which I found made them even grippier.
The shoulder buttons are similarly excellent. They’re positioned directly on top of the triggers, making them easy to reach, while also being placed far enough out from the triggers that you won’t accidentally activate them.
The Battery
The battery in the Nimbus is one of the best in any MFi controllers. It’s rechargeable, fully integrated into the controller, and gets over 40 hours on a single charge. The extensive battery life is likely due to the fact it connects to iOS via Bluetooth 4.1, rather than the older Bluetooth 2.1 standard used by other MFi controllers.
Also unlike every other MFi controller: the Nimbus charges it’s battery via the Lightning connection. This is a first for MFi controllers. I can only hope the rest follow suit, because it makes things much easier. Other controllers either require non-Apple-standard Mini or Micro USB cables, or require removable batteries. A rechargeable 40 hour battery that is charged via Lightning is a vastly better experience. The only negative: a Lightning cable isn’t included in the box. You probably have a bunch lying around, but still, it would have been nice.
Extras
I’m happy to report that SteelSeries fixed the other big issue they had, aside from the triggers: updating the firmware on the Nimbus no longer requires installing dangerous kernel extensions! SteelSeries has an app, and you can use it to keep everything updated. Its a few years late, but certainly welcome!
There is still one glaring omission: the Nimbus lacks any form of grip for holding an iPhone. I’m not going to lie: this is baffling to me. Gripping your phone into a controller may not be the best way to play, but it is better than nothing. By not including a grip, or even offering one as an extra purchase, SteelSeries basically takes the Nimbus out of contention for iPhone gamers. Considering that iPhones make up the vast majority of iOS devices… I don’t know what SteelSeries is thinking here.
Conclusion
I won’t bandy words here: the Nimbus is the best Bluetooth MFi controller you can buy. It improves on the previous controllers from SteelSeries in every way, and leapfrogs most other MFi controllers on the market in some fundamental ways.
Build quality is top-class; comparable to first-party controllers from Microsoft and Sony. Every component feels “premium”, with the analog sticks and ABXY buttons being particularly first-rate. The only less-than-perfect component is the d-pad, and even still, it isn’t terrible.
The Nimbus is a step forward for the entire MFi controller platform. The internal components have been upgraded, and support a more modern and efficient Bluetooth version. Charging via Lightning means you don’t have to keep a second type of cable lying around.
So should you buy the Nimbus?
For the vast majority of Apple TV gamers, the answer is definitely yes. Those who absolutely cannot stand the Nimbus’ analog stick layout should consider the PXN Speedy instead, and those who require the absolute best d-pad should consider the original Horipad. But for most people, the search should end with the Nimbus: it’s that good.
iPad Air and iPad Mini gamers have an additional consideration with the Nimbus. Some people – myself included – would prefer to clip their iPad into their controller, rather than separating the two and treating the iPad as a small TV. If you fit that description, you’d probably be happier with the Gamevice. It’s more expensive, but it provides an experience optimized around the device you connect it to.
For iPhone gamers, the Nimbus is a tough sell. It doesn’t matter how premium a controller is if it doesn’t work with your device. The Nimbus lacks any way to grip to your iPhone. If you’re fine sitting your iPhone on a table and squinting at it to play, the Nimbus works perfectly fine. But a controller with an integrated iPhone clip would probably make a lot more sense for most iPhone gamers – again, the Speedy comes to mind.
But if the Nimbus does fit with the way you play, don’t hesitate to pick one up. At $49, it’s cheaper than almost any other MFi controller’s list price. And for the first time in the history of the MFi controller program, this controller feels like it’s worth every penny of its asking price.
The iPad Pro is officially here. I've used the iPad as my primary computer for every aspect of AfterPad for the past 6 months, only breaking out the laptop for advanced photo editing. As such, the prospect of a large-screen, multitasking-optimized iOS device is compelling to me.
So after waiting in line at the Apple Store yesterday, I went home the proud owner of a fully-stocked gold iPad Pro. I've been using it steadily for the past 2 days, and while that is not enough time for a good review, it is enough for me to have some initial impressions.
The Size
The iPad Pro is big. Really big. It's effectively the size of two standard iPads next to each other. For working with documents, it's amazing. I can use a code editor on the left and a preview on the right, with a video playing in picture-in-picture, and not feel the slightest bit cramped.
The iPad Pro is far larger than the Air and Mini
The larger size doesn't make the Pro significantly more difficult to transport than the Air. Neither fit in a pocket, so you'll already be carrying a small bag. The iPad Pro fits right into my iPad carrying bag of choice, along with my SteelSeries Stratus and keyboard. The larger size does make it more difficult to use in bed – the iPad Pro is the first iPad that feels designed for use on a desk.
Performance
The iPad Pro feels almost identical to the iPad Air 2. Which is to say, it feels really, really fast. The fact that it doesn't feel like an upgrade from the previous model should not be taken as a negative – the Pro has twice as much work to do, pushing a vastly larger screen.
iPad Pro plays games just as well as iPad Air 2
There is one caveat: the version of iOS 9.1 that shipped with the iPad Pro suffers a few areas – multitasking, spotlight search, folder management – with choppy animations. For that matter, do does the iPad Air 2. Updating to the latest beta of iOS 9.2 makes both of these devices run as smooth as butter; it will surprise me if Apple doesn't push out this update very soon.
Aside from that, the iPad Pro is a powerhouse. Thanks to the 4 gigs of RAM, applications stay open for hours in the background and Safari allows many tabs open without requiring random refreshes. Thanks to improved RAM and storage bandwidth, apps download and open faster than ever before. Thanks to the dual-core 2.2GHz A9X processor, opening apps side-by-side doesn't degrade performance. Thanks to the 2X faster GPU, games run better on the iPad Pro than they do on the cutting-edge iPad Air 2.
The Speakers
The iPad Pro is the first iOS device to feature discreet, separated speakers – 4 of them actually – for true stereo sound at any orientation. Regardless of how you're holding the iPad, the system is smart enough to route sound through each speaker in such a way as to create a full stereo sound field. The speakers themselves are larger and louder than those of other iOS devices, creating more sound in addition to better sound.
The iPad Pro doubles as a better-than-HD TV
I was skeptical that small speakers, angled away from the user's ears, would be capable of generating good stereo sound. I'm happy to say I was wrong to worry. For the vast majority of situations – gaming, background TV, background music, FaceTime – the iPad Air 2's speakers are excellent.
I often watch TV in bed on my iPad. When I'm getting ready to go to sleep, I don't want to fumble with plugging in speakers or untangling headphones, so I've been using the tinny mono speaker on the old iPad Air 2. The iPad Pro is a massive upgrade.
The Pencil
I don't own an Apple Pencil yet, but I spent some time using it at the Apple Store, as did my artist girlfriend. It feels different than any stylus I've ever used – much closer in design to a physical pencil than to other styluses. In compatible apps, it supports pressure sensitivity and angles. It refreshes at a much faster rate than other iOS styluses, and uses guesswork to feel even more responsive.
In our (admittedly brief) use of the Pencil, it worked great. Closer to putting ink on paper than any other digital illustration method I've tried. After a half hour of use, my girlfriend was ready to switch to using the Pencil for all her sketches and game concept art illustrations. And I was ready to buy one, except the Apple Stores don't have them in stock, and might not for the next month.
iPad Pro fits in my 13-inch laptop backpack
When I finally do pick one up, my girlfriend will put together a full review of it for the site, from an artist and illustrator's perspective. But initial impressions are very positive, and if you do find a store with a Pencil in stock, seriously consider picking one up.
The Keyboard
I spent about 15 minutes using the new Apple iPad Pro Keyboard, and a bit less using the Logitech Create keyboard. Both were better than I expected. The Apple keyboard in particular, I was prepared to hate, but ended up typing well after just a few minutes of acclimation. The Apple keyboard lacks any shortcut keys or advanced inputs – no home button, no escape key, no page navigation – whereas the Logitech is fully decked out with inputs. And while the Apple Keyboard's felt keycaps aren't bad, they're inferior to Logitech's laptop-style scissor keys.
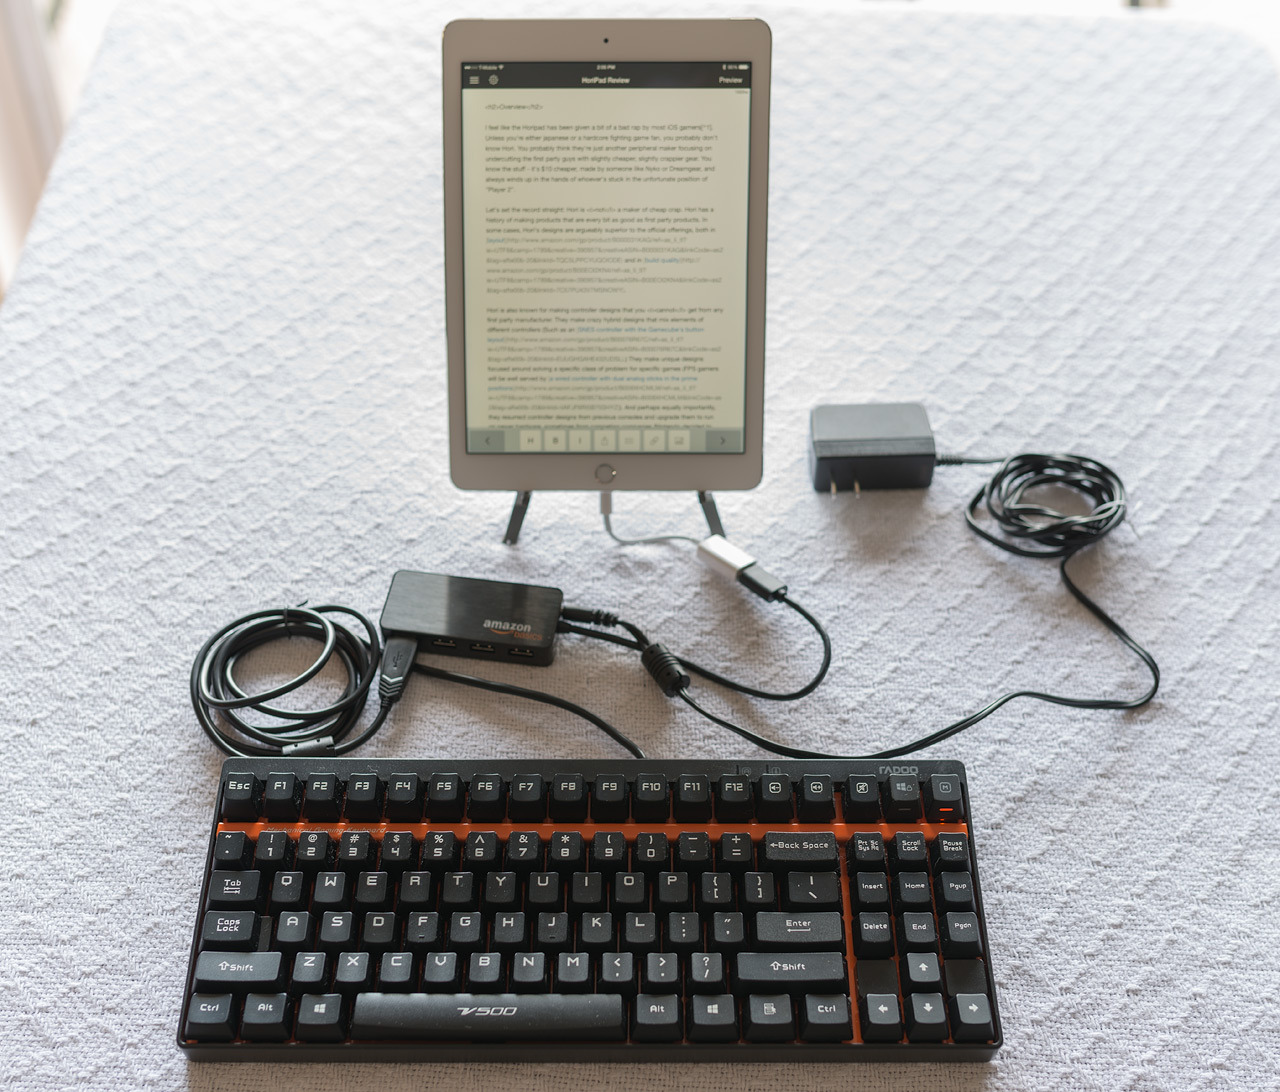
The good news is, the iPad Pro works with pretty much any Bluetooth keyboard. If you already own one, you can pair it with the iPad Pro, and it'll work just as well as it did on any other iOS 9 device. For my writing, I use a Bluetooth mechanical keyboard with full-sized keys and clicky switches, and it works perfectly. I'll probably still grab a keyboard cover of some sort, for portable use and typing in bed, but I'm content to wait for something more in line with my preferences.
If you're interested in a lot more of my thoughts on iPad keyboards, check out the AfterPad iPad Keyboard Review. Though I expect I'll eventually be writing up another one about iPad Pro keyboards.
The Software
I'll end my impressions with software, because it's the most important part of the iPad Pro experience. And as of now, it's the weakest link. Apps need to be manually optimized for the iPad Pro, and the vast majority have not. One's I'd expected to work – WordPress, Netflix, Reeder, Textastic – did not scale to the new layout, and don't work in multitasking or picture-in-picture. Other apps stretch to fill the full screen size, but obviously aren't designed for it, lacking any optimization.
The iPad Pro effortlessly handles multiple apps.
There's good news, though. In addition to Apple's apps, third-party apps that are optimized – Tweetbot, Instapaper, 1Writer, Coda, Procreate – are amazing. Coda's web development environment feels every bit the equal of a desktop program. Instapaper feels like reading a magazine. Procreate… I don't even know where to begin with apps like this. Creating art on the iPad Pro is vastly superior than any other iPad, and I expect this to quickly become the product of choice for artists.
Wrap-up
I respect my readers too much to pretend to review a product after only using it for a couple of days. These are some quick thoughts, based on things prospective buyers might be interested in knowing. I'll have a full review up when I have more time to use the device.
However, I'm not afraid to admit that so far, I'm extremely satisfied with the iPad Pro. It has a few rough edges, especially in non-optimized software, but I'm already preferring working with it to working with the iPad Air 2 or iPad Mini. The iPad Pro won't be the iPad for everyone, but two days is enough time to know it's the iPad for me.
At long last, the controller I’ve been waiting for is here.
For many, a Bluetooth controller, console-style, perhaps with a phone grip, is the perfect design. But while I’ve diligently reviewed these controllers, I’ve never particularly liked that form-factor. Even at it’s best, Bluetooth is finicky. Phone grips are nice to have, but the angle they hold the screen at has always been unpleasant to me. These controllers work great for playing on a TV, but to me, they just don’t feel suited to mobile play.
The Gamevice is the controller I wanted from the beginning. A purpose-built controller that actually feels designed for iOS. A controller that connects directly to the iPad, fits it like a glove, and doesn’t distract with random bluetooth disconnects or battery life concerns. A controller that gets out of your way and lets you play.
This review might re-tread familiar territory for those of you who’ve read my extensive Gamevice Preview article. But as this review will make clear, much has change between today’s Gamevice and the one I first used at CES. Pretty much every nitpick I had has been corrected, every rough edge polished, leaving a practically perfect controller.
In my opinion, the Gamevice is the best MFi controller ever made. But it’s also not for everyone. That statement might sound strange, but I’ll attempt to go over everything, good and bad, in this review, and explain exactly why I’ve reached the conclusions I have.
Design and Feel
Everything about the Gamevice feels premium. This should be expected from the $100 price tag, but is isn’t always the situation.
The plastic is nicely matted thoughout, with a surface texture reminiscent of the aluminum shell of the iPad itself. The buttons and triggers are a glossy, thick-feeling plastic.
Connecting your iPad Mini to the Gamevice is painless. Insert the iPad Mini (any version), Lightning-side-first, into the Gamevice, then pull the other half of the Gamevice outward and slip it around the other end of the iPad. The connection is snug – the Gamevice uses tension to pull both halves gently into the iPad, keeping it from wobbling. iPad cases are not supported, but I’ve never been a case person anyways.
Snap your iPad Mini into the Gamevice and start playing
The Gamevice’s shape is arguably its most unique – and controversial – feature. Unlike every other controller I’m aware of, the handles are angled away from your hands. Instead of your wrists facing inwards to grip the controller, they face outwards. The reason for this design was explained to me by the CEO of Gamevice as such: your hands grip inwards when holding a regular controller because of how small the controller is. Widen the controller, and your hands will naturally bend outwards.
That’s how it works in theory, anyways. In practice, I think the folks at Gamevice were a little too clever for their own good. The outward handles of the controller might make sense if the controller was wider than the distance between your arms. The thing is, an iPad Mini and a Gamevice just aren’t that wide – for me at least, they’re very close to the width between my arms. So my wrists end up being bent slightly outwards when holding this controller.
This isn’t the end of the world, but it gets a little unpleasant after several hours of continuous play, especially while lying down. Making the sides of the controller perfectly parallel would have made sense – indeed, this is the approach Nintendo took with their Wii U gamepad, and it’s the one Gamevice prototyped before redesigning their controller to the current form.
This inverted handle design might turn out to be more comfortable with the larger size of the iPad Air Gamevice. As it stands with the iPad Mini, they overthought this situation and made the controller a little bit less perfect than it should be.
The inverted handles contrast with traditional controller design
The Details
A good controller is more than the sum of its parts. But those parts still count for something. Many MFi controllers have been great in most ways, but suffer one fatal flaw or another in the details – the Stratus XL has terrible triggers, the PowerShell has a painful d-pad, the Stratus has flimsy analog sticks. Does the Gamevice have any deal-breaking flaws? Read on.
The Analog Sticks
The analog sticks establish what turns out to be a common pattern with the Gamevice: borrow the best aspects of the Xbox One controller. Just like an Xbox One controller’s analog sticks, these are pleasantly rubberized, concave, and full-size. They feature a ridged rim around the edges of the stick, creating an exceptionally grippy surface that your thumbs will never slip from.
The Gamevice uses concentric rings for the edges of the analog sticks. It isn’t quite as pleasant as the cross-hatched ridge on the Xbox One controller, but it feels almost identical, and it’s far superior to the stick design of any other MFi controller. In fact, it’s probably the second best analog stick design I’ve used, just behind the Xbox One’s.
After relatively heavy play for the past 9 months, the rubberized ridges show minimal wear, and still grip my thumb perfectly. This serves as a testament to how much better this stick design is to the Xbox 360’s, which wears down notoriously fast.
Perfect buttons, perfect joysticks
The ABXY Buttons
The face buttons on the Gamevice are perfect. They’re large – the same size as those on an Xbox controller, and slightly smaller than those on a PlayStation controller, making them perfect for pulling off difficult button combos. They’re rounded off, with a pleasant beveling that prevents the type of thumb pain I find my self getting after extensive gaming sessions on a Wii U gamepad. They’re double-shot plastic, meaning the colors on the buttons are never going to fade, no matter how much you use them. They activate smoothly, meaning they’ll never have the sort of plastic-on-plastic grind a few controllers occasionally exhibit.
As I said, they’re perfect.
Killer buttons and d-pad make the Gamevice perfect for retro gaming
The D-pad
The Gamevice has by far the best d-pad of any MFi controller. Just one look goes a long way towards telling you why. This is the only MFi controller without the dreaded circular d-pad. Many of us assumed that Apple’s MFi spec required controllers to have circular d-pad; this was inaccurate. The Gamevice’s d-pad fits perfectly well within Apple’s standard, thus making the terrible d-pads on (almost) every other MFi controller even less excusable.
The Gamevice’s d-pad takes the shape, texture and position of the Xbox One d-pad and couples it with the activation feel of the Wii U’s d-pad. It’s a good fit. The mechanical clickiness you get when you activate the Xbox One’s d-pad is a little bit nicer, but hey, I’m not going to complain – again, the Gamevice’s d-pad is far better than that of any other MFi controller.
The first excellent d-pad on an MFi controller
The Shoulder Buttons and Triggers
The triggers and shoulder buttons are as close as the Gamevice comes to having a weakness, and they’re still not bad.
Ironically, the problem here is that the Gamevice copied the Xbox One controller almost perfectly, and the Xbox One has a flawed shoulder button design. Unlike the excellent shoulder buttons on the Xbox 360 controller, the Xbox One changes the shape of the upper shoulder bumpers such that it’s difficult to reach them with the side of your pointer fingers. You either have to adopt a middle-fingers-on-the-triggers grip, or you have to reach your finger awkwardly around from the triggers to the upper shoulder buttons. It would have been nice if the Gamevice had corrected this problem, but no such luck. It’s better than many controllers, but it’s a slight blemish on an otherwise great design.
In my preview of the Gamevice, I mentioned some roughness activating triggers. This was corrected in the final controller – the triggers are smooth, pleasant, and activate with a nice (though light) degree of pressure. It would just be even nicer if moving your finger between the triggers and shoulder buttons wasn’t so awkward.
The Gamevice borrows much from the Xbox One controller
Extras and Ports
Using one micro USB cable, you can simultaneously charge both the Gamevice and the connected iPad. This is an essential feature for marathon game sessions, and I’m happy to say it works exactly as expected here. This may seem obvious, but the MOGA Ace Power doesn’t charge the iPhone it’s connected to while the controller is charging.
Audio output for the Gamevice is handled via an integrated headphone port. This means the Gamevice itself handles audio decoding, rather than the iPad. This had issues in prototype versions of the iPad – the left and right stereo channels were inexplicably reversed on most of the prototypes I used – but this issue appears to be resolved on the final version. Sound quality is good, though not quite as good as the sound from the iPad’s integrated headphone jack. It’s perfectly serviceable for gaming, but disconnect the Gamevice when it’s time to listen to music.
Use AirPlay to beam your iPad gaming to the TV
iPad Compatibility
There has been some confusion about exactly which devices the Gamevice is compatible with. Let me be clear: the Gamevice I’m reviewing today – the only Gamevice currently available – is exclusively compatible with the iPad Mini, iPad Mini 2, iPad Mini 3, and upcoming iPad Mini 4. I have personally used a prototype of the iPad Air version, but not nearly enough to review it at this time.
This leads to an important point: in terms of gaming performance, the iPad Mini line is the weakest line of iOS products Apple sells.
When the Gamevice was first conceived, this wasn’t the case. The iPad Air and iPad Mini 2 were equally powerful, meaning there was nothing to dissuade gamers from buying the smaller iPad, and the folks designing the Gamevice from targeting those gamers. Then Apple changed the rules. The iPad Air 2 was released as a quantum leap in performance over every other iOS device, whereas the iPad Mini 3 was stuck with the same aging A7 processor from the previous generation. Suddenly, gamers had a clear reason to opt for the larger iPad Air and avoid the Mini.
So here we are. The Gamevice is out, but only compatible with the weakest iOS device Apple sells. There was some hope that Apple would change this with the iPad 4, but unfortunately, even with its upgraded internals, it is still the weakest gaming device Apple sells.
That is not to say the iPad Mini is a bad device for gaming; it’s actually quite excellent. The A7 chip in the Mini 2 and Mini 3 and A8 chip in the Mini 4 are more than capable of holding their now. The problem is, they’re far weaker than the chips in the larger iPads, meaning most hardcore gamers would probably opt for the larger devices, making the market for a hardcore iPad Mini gaming accessory potentially small.
I can’t help but feel that the upcoming iPad Air version and iPhone version of the Gamevice will be much better – and more successful – products.
The Gamevice combines Wii U layout with the Xbox One design
Conclusion
In the past, every MFi controller review talks about how well (or poorly) a controller works within the confines of Apple’s MFi spec. I’ve always had to use that crutch – the controller is great for an MFi controller. With the Gamevice, this clarification is unnecessary. The Gamevice isn’t just a great MFi controller. The Gamevice is one of the best controllers ever made, of any kind, for any platform.
Sure, it borrows a lot from Microsoft’s Xbox One controller. But so what? The Xbox One controller is great. The history of game controllers is comprised of companies copying features and layouts first pioneered by other companies. The Gamevice takes the best aspects of the Xbox One controller, puts them in a form-factor similar to (but superior than) the Wii U Gamepad, and packages it all together to perfectly the iPad.
The Gamevice is the best MFi controller, period.
I can’t tell you whether or not you should spend $99 on a controller. What I can say is that this is the best MFi controller ever. I can tell you that unlike other controllers that launched at this price point, the build quality actually reflects the asking price.
The only thing holding me back from wholeheartedly recommending the Gamevice is the exclusive compatibility with the iPad Mini. The Gamevice is an incredible controller, but as a gaming device, the iPad Mini is questionable. Investing $99 dollars into a controller that only works with Apple’s weakest iOS device might be a mistake. The iPad Mini 4 remedies the issue somewhat by including an A8 processor, but that still places it firmly at the bottom of Apple’s range. The Gaming iPad is unquestionably the iPad Air, and that version of the Gamevice makes a lot more sense to me.
But that’s a topic for another review. The fact of the matter is, if you want the best controller you can possibly get for your iPad Mini, this is it. In fact, the Gamevice is far and away the best MFi controller, period. The price is intimidating – $99 is twice as much as other perfectly serviceable controllers – but the Gamevice is more than twice as good as the competition.
My iPad Mini no longer leaves my Gamevice; this is how I play iOS games now.
I feel like the Horipad has been given a bit of a bad rap by most iOS gamers1. Unless youâre either Japanese or a hardcore fighting game fan, you probably donât know Hori. You probably think theyâre just another peripheral maker focusing on undercutting the first party guys with slightly cheaper, slightly crappier gear. You know the stuff – itâs $10 cheaper, made by someone like Nyko or Dreamgear, and always winds up in the hands of whoeverâs stuck in the unfortunate position of âPlayer 2â.
Letâs set the record straight: Hori is not a maker of cheap crap. Hori has a history of making products that are every bit as good as first party products. In some cases, Horiâs designs are argueably superior to the official offerings, both in layout and in build quality.
Hori is also known for making controller designs that you cannot get from any first party manufacturer. They make crazy hybrid designs that mix elements of different controllers (Such as an SNES controller with the Gamecubeâs button layout.) They make unique designs focused around solving a specific class of problem for specific games (FPS gamers will be well served by a wired controller with dual analog sticks in the prime positions). And perhaps equally importantly, they resurrect controller designs from previous consoles and upgrade them to run on newer hardware, sometimes from competing companies (Nintendo decided to make a GameCube controller for the WiiU, but Hori beat them to it).
The Horipad for iOS is a little bit of all of these. Start with a really, really well made PS2 controller. Take an upgraded version of the analog sticks from the Xbox 360âs controller and stick them in the secondary positions. Add a high-performance MFi-certified Bluetooth connection and an integrated rechargeable battery. Finish with one of the very best circular d-pads ever made2. Thatâs basically what Hori made here. Itâs not the most unique controller, but itâs a hell of a well-made one, and it does an admirable job remixing elements of other controllers into something unique and excellent.
This is the best way to re-live classic console gaming
Design
Appearance
If Iâve perhaps spent a bit too long setting the stage for the high quality of this controller, and of Horiâs products in general, itâs because thereâs a good reason for it: this controller looks like a cheap toy. Glossy plastic, screw holes, visible seems⦠this doesnât even look like itâs playing in the same league as the other MFi controllers. Line them all up and ask a stranger which ones looks the cheapest, theyâre going to pick the Horipad every time. Perhaps the Horipadâs visual aesthetic is due to it being a Japanese product geared to an asian audience. I donât know enough about the cultural differences between Western and Asian gamers, but I do know Horiâs controller is heavily geared towards Asia3.
The entire controller, front and back, is clad in some of the glossiest, most fingerprint-absorbing black plastic the world has ever seen. Seriously, donât even bother dusting this one; If you so much as glance at the Horipad, itâll pick up your fingerprints. Breaking up the sea of black plastic lies a silvery, faux-brushed-metal figure eight design surrounding the analog sticks. The black part of the controller contains the worlds âHORIPAD WIRELESSâ, and the silver part an inch below it again contains the word âHORIâ, and the symbol for bluetooth wireless. The rear of the controller contains multiple other combinations of âHORIâ and âwirelessâ. Apparently someone thought this was such a great name, everyone deserved to be repeatedly reminded of it every time they glanced at the controller.
Letâs not play around here. Visually, the Horipad is way off the mark. The industrial design looks cheap and tacky, and is completely at odds with Appleâs aesthetic. Thatâs a real shame; beneath the Horipadâs glossy exterior lies a controller thatâs built like a tank.
The Horipad synergizes elements of the Xbox and PlayStation controllers
Build Quality
Picking up the Horipad is surprising. In stark contrast to itâs visual aesthetic, the Horipad feels amazingly solid. Itâs heavy, but not too heavy. Itâs difficult to put into words why this controller feels as good as it does. It may look like a cheap toy, but that first impression melts away after you pick it up; in your hands, the Horipad feels like a premium product.
That same glossy plastic that looks cheap from a distance actually feels great in your hands. I still tend to prefer high-quality matte plastic to glossy, but thatâs a matter of personal preference. If you are a fan of the way glossy plastic feels in your hands, the Horipad is one of the finest examples of a glossy surface plastic Iâve ever felt.
The fact of the matter is, very few controllers of any kind feel this well constructed. The SteelSeries Stratus XL does. The Gamevice does. The Xbox One and PlayStation 4 controllers do. Thatâs pretty much it.
Ergonomics
These days, popular controllers all tend to fit a similar design: large controllers with wide, semi-flat handles, analogs sticks placed in a prime position to be directly under thumbs, and an ergonomic shape that feels designed to rest gently in your hands. This was the design pioneered by the Dreamcast controller, refined by the various Xbox controllers, and now emulated by Nintendo and (to a lesser degree) Sony.
The Horipad is nothing like an Xbox 360 controller. It does not feel ergonomically sculpted to rest inside your hands – in fact, resting it on your hands without gripping it will put it off-balance. Itâs handles are small and angled sharply down, such that youâll find yourself gripping them tightly with your lower fingers. Itâs analog sticks are spaced low, requiring you to actively reach for them with your thumbs. To be blunt, itâs not the most comfortable controller in the world.
But superficial comforts only go so far. The real question is: how does the controller feel over long play sessions? Is it painful? Is it hard to use? Does it fall out of your hands and crash onto the floor in an explosion of screws and plastic?
Good news: for such a âretroâ feeling controller, the Horipad hold up amazingly well for long play sessions. I beat the entirety of Tony Hawkâs Pro Skater 2 with the Horipad over the course of a couple of sittings, and at no point did it feel like I was fighting against the controller. To be honest, it was a more pleasant experience than a long session with the superficially more comfortable Stratus XL; as comfortable as that controller feels, it causes me to get hand cramps after lengthy play sessions.
The Horipad is a great example of how appearances can be deceiving. The Horipad looks cheap and uncomfortable, but itâs a hell of a well-built device, and one you can use for hours on end without experiencing the slightest discomfort.
The surprisingly vertical nature of the grips takes some getting used to
The Details
Analog Sticks
Think of the analog sticks on the Horipad as the lovechild of a Dualshock 3 and an Xbox 360 controller. Take the best aspects of the 360âs analogs – great shape and concave surface – and put them in home position occupied by the Dualshockâs sticks. It may seem like an odd design decision, but it works!
The Horipad is undeniably a retro-focused controller, so putting the d-pad in the prime, âunder the thumbâ left position makes sense. At the same time, using the âconcave with 4 bumpsâ stick shape throws a bone to gamers who grew up using the 360 controller, and doesnât make the Horipad seem quite so foreign.
Best of all, the Horipad has extremely little dead zone. MFi controllers tend to get a more criticism than they deserve regarding their analog dead zones4, but those sensitive to dead zones will be overjoyed – the Horipad has lower dead zones than any controller Iâve ever tested, MFi or otherwise.
Analog sticks are similar to those of an Xbox 360 controller, though slightly taller
The ABXY Buttons
The âABXYâ face buttons on the Horipad are just about perfect. Theyâre large, springy, generously spaced, and comfortably smoothed. After hours upon hours of play, I have nothing but high praise for the Horipadâs buttons. Theyâve never stuck, caused discomfort, or caused a single miss-click due to bad button placement.
Gamers more accustomed to mobile control layouts might have to adjust, since the Horipadâs buttons are quite large. Xbox and PlayStation gamers, however, will be right at home – the Horipad takes cues both from the shape and spacing of the PlayStation controllerâs buttons and the roundness and size of the Xbox controllerâs buttons, and combines them into a perfect middle ground, improving on each in the process.
After using every MFi controller, I can say unequivocally that the Horipadâs ABXY buttons are the best of all available controllers. Only the upcoming Gamevice is in the same ballpark.
Perfect buttons and the best d-pad on any bluetooth MFi controller
The D-Pad
Every word Iâve written up until this moment pales in comparison with what youâre about to read next:
The Horipad has an excellent d-pad.
If youâve been following MFi controllers at all, you should be hearing, in your head, a chorus of angels singing hallelujah! Because until now, the d-pads on MFi controllers have been utter crap; and thatâs the best case scenario. At their worst, theyâve made the entire controller effectively unusable for serious gaming.
So let me type it again, because it feels so good to type: the Horipad has an excellent d-pad. Itâs a perfectly sized, sensitive, pleasant-feeling circular d-pad.
If youâre primarily a fan of side-scrolling platformers or retro game emulation, the Horipad should be the only controller you even consider. Itâs such a monumentally big difference between the Horipad and the controller with thesecond best d-pad.
Circular d-pads will never be my preference, especially compared with the plus-style d-pads used by Nintendoâs controller and the Xbox One pad or the island-style d-pad buttons used by Sonyâs controllers, but beggars canât be choosers. Apple dictates a circular pad, and Hori gave us a hell of a good circular pad within Appleâs requirements.
Shoulder Buttons
Letâs take the Horipad off the table for one more class of gamer: hardcore FPS players. Unlike every first-party console controller from the past decade, the Horipad does NOT feature triggers. The MFi controller standard doesnât require them, and while most controller makers have opted to include them on their full-size controllers, Hori has instead chosen to replace them with L2 and R2 buttons. Great news for PS1 fans, less so for shooter fans.
No triggers here – say hello to your old friends R2 and L2
Other Buttons
Rounding things off, the Horipad includes the Apple-standard pause button right in the middle of the controller. It works well enough, and you wonât have to be pressing it anywhere near as often as the other buttons.
The power button is located near the pause button, but is curiously made from cheap feeling, tv-remote-button rubber. If it was any other button, Iâd be up in arms about it, but itâs just the power button – it doesnât have to be âgaming gradeâ.
Far more troubling is the Bluetooth button. Clumsily integrated as a slim, finger-nail-sized button pressed up against the part of the controller that houses the analog sticks, and clad out of the same tv-remote-button rubber as the power button, the Bluetooth pair button is a black mark against the Horipad.
And while weâre on the subject of Bluetooth pairing, hereâs where we get to the biggest problem Iâve experienced with the Horipad. After holding the bluetooth pair button for 10 seconds or so, I found myself stuck in a loop, unable to actually pair the controller with any device. As soon as the iPhone or iPad found the controller and attempted to pair, the controller would reset the pairing and forget the connection. Either I broke the firmware somewhere or I broke the pair button itself, but absolutely nothing I attempted would make the controller work – I ended up returning it (thanks to Amazonâs excellent return policies) and getting a replacement.
So⦠be careful. Thatâs the best advice I can give here. Follow the pairing directions carefully, and donât press too hard on the button. I havenât experienced any issues with this second controller, and I donât want to risk it.
The Horipad is surprisingly large in person – closer to a C.T.R.L.i than a Dualshock
The Software
This is the part of the review where Iâd normally be discussing controller drivers, software, web support. Sadly, Hori doesnât have anything to discus. The Horipad has no Hori-sanctioned list of games. The Horipad has no iOS app. The Horipad has no firmware management PC app.
The controller appears to work perfectly on every version of iOS 7 and iOS 8. If that ever fails to be the case – as has happened before – I have absolutely no idea what Hori would do about it. Letâs hope it doesnât come to that.
The Horipad, on my wall alongside a variety of other controllers
Accessories
The accessories included with the Horipad do a great job of highlighting just what the target audience is for this controller. If youâre an iPhone gamer looking to clip your device into a controller, move right along; thereâs nothing to see here. The Horipad doesnât include any form of integrated device clip. Instead, a small (but surprisingly nice) plastic dock is included with the controller. If you really want to stand your iPhone up on a table and squint over at it while holding the controller in your lap, well, more power to you. For most people, the Horipad should be thought of as an iPad controller. While the stand is perfectly useable with all models of iPhone, it really shines with the iPad Air and iPad Mini.
Also in the box: a short USB cable for charging the integrated controller battery. This is a Mini B type cable; the same kind of cable used by PS3 controllers and old external hard drives, as opposed to the more modern Micro cable most devices use. The cable is decent, but heavy users will probably want to upgrade to something a little nicer.
Battery Life
Unlike the Mad Catz C.T.R.L.i line and the full-size SteelSeries Stratus XL, the Horipad features an integrated battery, rather than relying on AA or AAA batteries. Hori rates the battery life of the Horipad 20 hours, and while this sounds a bit small compared to the competition, I’ve found that the controller lasts a comparable amount of time in actual usage.
Iâll take an integrated battery with a charging cable over external batteries any day. What you lose in the ability to quickly swap out batteries, you gain in the fact that your batteries donât go dead in the first place since you can just keep the controller charged when youâre not using it.
The Horipad is among the best of the growing field of bluetooth MFi controllers
Conclusion
Most people are going to take one look at the Horipad and dismiss it out of hand. Itâs cheap looking, it lacks any way to clip your iPhone into it, it has a high price tag, it uses the less-popular PlayStation-style analog arrangement, it lacks triggers⦠first impressions arenât good.
The fact is, these complaints are all valid. But there is still something about the Horipad⦠the whole is greater than the sum of itâs parts.
The Horipad is a controller for a certain type of gamer. Itâs for the retro game fan. Itâs for the gamer who grew up on PlayStation, Nintendo, or Sega. Itâs as far away from an Xbox controller as you can get. If you want to play shooting games, get a controller with triggers. The Horipad is for gamers who want to play Sonic, Tony Hawkâs Pro Skater, Ridge Racer, Monster Hunter⦠games from before everything turned into a shooter.
After heavily testing every single Bluetooth MFi controller (and reviewing almost all of them), the Horipad is the one I keep coming back to. If you want the best possible controller to play Bioshock, the Horipad isnât going to be for you. But thatâs okay – you have a lot of great options. The Horipad is the first and only good option for retro gamers. And itâs a really, really great option to have.
Most controllers include a tiny dead zone in their analog sticks, in order to prevent accidental motion. MFi controllers are no exception. Hardcore gamers who are accustomed to performing light, deliberate movements on the analog sticks are most likely to notice these dead zones, where their movements have no effect.
Contrary to what some people claim, the iPad is not a media consumption device. The iPad is not incapable of doing âreal workâ. In fact, most of the writing for this site is done directly on my trusty iPad Air 2. I handle all of AfterPadâs HTML, database management, and coding directly from my iPad.
The only thing I need to do these activities is a great keyboard. And Iâll admit, this is one area the iPad falls behind traditional computers. Laptops have decent keyboards built-in and desktops can use any external keyboard under the sun. For iPads, the selection is much more limited, and much less capable. Most keyboards are cheap, poor quality devices, designed more for their portability than for serious typing.
These keyboards donât interest me. I do real work on my iPad, and I set out to find the very best keyboards to allow me to do real work. The field isnât as big as you might expect, and Iâve spent the past several month testing keyboards and narrowing down my choices.
I want to start off by laying out a few of my requirements. Iâm only interested in keyboards that meet these conditions; there is a whole world of amazing keyboards out t for would have to meet these requirements, or have a very good excuse for not meeting them.
First, the keyboard must have a Mac key layout. No exceptions on this one. I want to use my thumb to activate the Command key, not my pinky. Iâm too old to change.
Second, Iâm not interested in a keyboard case. Magnetic covers are fine, but not cases. I donât want to leave my iPad in a case all the time, and I donât want to fumble with inserting it and removing it from a case whenever I want to use the keyboard. This requirement removes a lot of compelling options. Clamcase, Logitech, and Zagg make some very well reviewed keyboard cases; they just arenât for me.
Third, I need to be able to use Forward-Delete. I use the forward-delete functionality a lot. Less in my writing, but constantly in managing the game database. If I have to hold FN plus the regular Backspace key, Iâll live. But keyboards without either the FN key or a true forward delete key are out of contention.
Lastly, I want the size to be manageable. No Huge Keyboards. I have no interest in the number keypad, 50 extra gaming macro keys, or a bunch of obsolete keys like numlock and print screen. For external keyboards, the tenkeyless form factor is the absolute largest Iâm interested in – something closer to laptop-sized would be even better.
Those requirements limited my field of interest to three different form factors: keyboard covers, laptop-style external bluetooth keyboards, and ultraportable mechanical keyboards.
The Best iPad Keyboard Covers
First off, I decided to try my chances with a keyboard cover. Unlike a full keyboard case, covers clip on magnetically, and are thus easy to remove when not in use. Theyâre extremely convenient, as they connect over Bluetooth and can be transported directly alongside the iPad.
Even with the larger iPads, keyboard cases canât provide a key layout as large as a laptopâs, so provide an inferior typing experience to a full-size external keyboard. Still, the extreme portability and integrated iPad stand provide benefits of their own, which arenât matched by external keyboards. If you can make due with the inferior typing experience compared with an external keyboard, cover-style keyboards have a lot going for them.
Finding the best cover style keyboard wasnât difficult. Once you get rid of the low quality Chinese keyboards that make up the bulk of the Amazon results, are only two options worth considering, both of them by Logitech.
The Logitech Ultrathin Keyboard Cover for iPad Air 2
The obvious starting place was Logitechâs âlatest and greatestâ keyboard cover: the brand new Ultrathin 2 for iPad Air 2. This is the latest in a long, long line of Logitech keyboard covers, stretching all the way back to the first iPad. Somewhere midway through the life cycle of the first iPad Air, Logitech released a major redesign of their Ultrathin Keyboard Cover. This redesign features larger keys, a thinner case, better function keys, adjustable docking angle, and a magnet to sleep the iPad when closed, just like Appleâs Smart Covers.
Theres only one problem: this redesign is worse than itâs predecessor in virtually every way.
The keys on the Ultrathin 2 may be bigger, but they occupy the exact same footprint as itâs predecessor, meaning you arenât gaining any finger real estate. The âthinner caseâ simply results in shallower key travel, making for a less pleasant typing experience, without any meaningful gain in portability. The keys arenât just cramped, theyâre also wobbly, which stands in sharp contrast to the stability of itâs predecessor. The adjustable docking angle is a nice idea, but it only adjusts backwards, while the angle is already is too far back as it is.
All of those are unfortunate downgrades, but they pale in comparison to the real deal killer: the keyboardâs hinge. The main benefit of a keyboard cover is it can be quickly clipped on and off. Not so with this keyboard cover. This hinge is designed such that it only opens up to a short, 30-degree angle, requiring you to carefully remove your iPad at a tight angle without scratching the screen against the keys. Absolutely terrible design.
All of these âupgradesâ come at a price ranging from $80-$100. Ridiculous. Logitech has a track record of releasing redesigned versions of their products that are significant downgrades on previously-killer products – this keyboard cover is the most egregious example yet.
If, for some reason, you canât find a better keyboard cover than this, itâs available now for $89 in both space gray and silver aluminum models.
The Logitech Ultrathin Keyboard Cover for iPad Air (First Version)
The good news is, not only can you still get the original Ultrathin Keyboard Cover, but you can get it at significant discounts, since itâs âobsoleteâ.
What you get with this obsolete hardware is amazing quality (for their size) keys, great built quality, a strong hinge that actually functions correctly, and a long lasting battery. Seriously, itâs like a night-and-day difference. These keys are springy, spacious, and pleasant feeling. None of the shallowness or wobble of the later model.
There are only two downsides to this keyboard. One: the iPad Air 2 rests back at a steeper angle than Iâd like. Two: the iPad doesnât automatically lock when you close the cover. Thatâs it. Everything else is better than any other keyboard cover Iâve used in every way. Those are unfortunate.
I managed to purchase this keyboard for about $35 on Amazon. Itâs currently sold out, but is restocked occasionally. You can also find it being clearanced out at office supply stores and big-box electronic retailers; if youâre looking for a killer keyboard case for an iPad Air or iPad Air 2, finding one of these on sale will likely be both the cheapest and best option available.
You can find the Ultrathin Keyboard Cover in both space gray and silver aluminum models.
Slim External Keyboards
As great as the Ultrathin Keyboard Cover is, after using it for about a month, I concluded that it wasnât for me. I do almost all of my writing on the iPad, and I just donât want to deal with the trade-offs associated with a small keyboard size. Maybe once an 12-inch iPad comes out, Iâll reconsider this, but a 10-inch keyboard just doesnât cut it for me when it comes to long-form writing and database management.
The good news is, I donât particularly mind bringing an external keyboard with me, if it makes for a superior typing experience. I carry my iPad and accessories in a messenger bag, and thereâs plenty of room in there for a small keyboard.
After thoroughly testing all the major models from the big brands, I managed to narrow down my selection to the few contenders most people will want to consider.
The Apple Bluetooth Keyboard
The obvious starting point is Appleâs own Bluetooth keyboard. This keyboard is built with the usual Apple build quality – one solid piece of aluminum, keys with perfect feeling plastic, and brilliant little design aesthetics all around (especially the battery compartment!). I like Appleâs keyboard layout – it works well enough with the Macbooks – so something like that on iOS would be a great starting point.
Unfortunately, Apple did a pretty terrible job with optimizing this keyboard for iOS.
Donât get me wrong; the build quality is great, the keys are pleasant feeling scissor-style designs, and the battery life is good. Itâs a fine keyboard. It just isnât designed in any way for iOS. No home button, no search functionality, no multitasking switch. Instead you get a bunch of superfluous Mac commands for Dashboard and Mission control.
Worst of all, I experienced occasional Bluetooth stutters. Iâd be typing away, and a letter or two might get occasionally dropped, or the shift key might be held a little too long in software. This might be related to the relatively ancient version of Bluetooth used by this keyboard, which hasnât been meaningfully updated since 2011. Whatever the reason, it isnât good.
If you already have an old Apple Bluetooth keyboard lying around, you might as well give it a shot with the iPad, see if it works for you. For anyone else, donât bother. For the $70 or so Apple is asking for this keyboard, you should expect a lot more. Rumor has it Apple is planning on upgrading it soon. From my experience with the current version, this upgrade canât come soon enough.
The Logitech Easy Switch Keyboard
After my disappointment with Appleâs keyboard, I tested a variety of Logitechâs tablet offerings, eventually concluding that the Logitech Easy Switch was by far the best of the lot. This is not an original conclusion – the Easy Switch is a very highly reviewed keyboard.
In contrast to Appleâs bare-bones bluetooth keyboard, Logitech throws everything in to this but the kitchen sink. Aluminum construction, fully backlit keys, media and home key options, and different Mac and Windows layout versions all headline the feature list. But the most important function, the one that gives this keyboard itâs name, is the multi-device switching capability. The Easy Switch features three dedicated device keys in the top left, and can simultaneously pair with up to three different devices. Switching between your PC and your iPad is as simple as hitting a key.
All of those features are great, but theyâre nothing compared to the Easy Switchâs best aspect: itâs a hell of a good keyboard. They keys are perfectly sized, made of a high-quality-feeling plastic, generously spaced, and perfectly springy. Honestly, these might be the best scissor-style keys Iâve ever used. Itâs not easy to beat Apple when it comes to this stuff, but Logitech raised the bar here.
The Easy Switch keyboard manages to cram all of itâs features into a very small, portable package. While not as portable as a keyboard cover or case, this external keyboard does not waste space. The fact that it sports a laundry list of great features and is significantly thinner than Appleâs keyboard highlights just how much Apple needs to update their offering.
Honestly, after testing all of these keyboards, the Easy Switch is probably the one Iâd recommend to most people. Itâs not as portable as a keyboard cover, but itâs not as bulky as a bigger mechanical keyboard – a perfect middle zone. Itâs available in both Mac and PC layouts for a list price of $100, though I managed to get mine for $40 at Office Max – deal hunt on this one.
Other Options
Although the Logitech Easy Switch is ultimately my pick in portable keyboard design, I spent some time testing a variety of other keyboards, the more interesting of which Iâll discuss below.
Microsoft makes a pretty good iOS keyboard called the Universal Mobile Keyboard. It has a great design, solid build quality, and springy keys. Unfortunately, it isnât significantly larger than a keyboard cover. Seriously, itâs just as cramped as the Ultrathin keyboard cover, but without any reason – nothing restricts it to being the same size as an iPad! If Microsoft is targeting people who are already committed to bringing an external keyboard, Iâm not sure why they felt the need to make it so small. It doesnât really make any sense to combine the size disadvantage of a keyboard case with the inconvenience of an external keyboard. I donât understand who this product is for, but if you think itâs for you, itâs available in both white and black models for about $65.
Logitech had one more potentially interesting keyboard: the Logitech K480 Bluetooth Multi-Device keyboard. Superficially, this keyboard appears to have the same excellent keycaps from the Easy Switch, but in a much cheaper package, while also integrating a stand to hold your iPad and iPhone. Sounds great to me! Sadly, these are not the same keys used by the Easy Switch. These are wobbly, cheap, plasticky keys. A missed opportunity here – I wouldnât want to type on these for an extended length of time. They look the same, but the feel is all wrong. Still, if you REALLY need an integrated stand, this is about your only option, and itâs worth a look. It comes in black and white versions, and is available for about $49.
I also broke my oath the never use another Belkin product and spent some time with their Secure Wired keyboard. This keyboard is unique in that it attaches to the iPad via Lightning. This appeals to me in theory – bluetooth can be finicky. Sadly, like basically ever Belkin product, the build quality is terrible. Wobbly keys, tiny arrow keys (even though theyâre off-set with enough room to be full size!), and zero forward-delete functionality. This feels like a $15 keyboard youâd see a school outfit their classrooms with, but it actually retails for $60. If you absolutely MUST have a wired keyboard for security reasons, this is the best one available. But donât take that as a recommendation – it isnât.
Mechanical Keyboards
If you really want to fall down the rabbit hole into insanity, you have to enter the world of mechanical keyboards.
Mechanical keyboards – sometimes known as Clicky keyboards, Gaming keyboards, or Hipster keyboards [citation needed] – include elaborate mechanisms embedded underneath the keys themselves in order to provide a more tactile typing response. Sometimes this response is augmented by an audible âclickingâ noise, either from people bottoming-out the keys or from additional clicking elements embedded in the keys themselves.
These are different from the crappy keyboards that dominated PC lineups from the late â90s through late 2000s – those are known as Membrane keyboards. The keys themselves have the same external shape as mechanical keyboards, but the actual typing experience is generally unpleasant, with a sort of soft, mushy feel. Iâd take laptop-style scissor keys over membrane keys any day – not so with mechanical keys.
If all of this sounds confusing, thatâs because it is. The world of mechanical keyboards is reminiscent to the world of audiophile music listening. There are real, tangible benefits to investing some time into both. There are also people who are happy to sell you snake-oil-flavored placebos for outrageous prices. But while the world of audiophile music has at least some objective facts on itâs side (although many choose to ignore them), keyboards are almost entirely a matter of personal preference. These preferences are primarily embodied in the type of mechanism inside the keys, which is known as the key switch.
I didnât expect to have much difficulty finding an iPad-compatible mechanical keyboard. I was expecting that Iâd be able to plug any old mac-compatible mechanical keyboard into the iPad via the Lightning to USB adapter and start typing away without issue. I was wrong.
My first problem was actually finding a mac-compatible mechanical keyboard that wasnât huge and covered with extraneous keys. I had assumed this would be the easy part, but the vast majority of mechanical keyboards these days are focused around gaming, which is an area in which the Mac still lags behind Windows PCs. Gaming keyboard companies like Razer rarely make Mac-layout keyboards, and when they do, itâs only for the most expensive (and therefore buliest) models. The size of these makes them a non-starter for me, as I want to be able to carry the keyboard with me in a messenger bag or laptop case. Specialist keyboard companies make Mac-optimized mechanical keyboards, but these are very expensive, and still arenât specifically designed for the iPad. If Iâm going to spend between $100 and $200 on a keyboard, Iâm not going to tolerate a hacked-together solution.
I was eventually able to settle on one reasonably priced, Mac-compatible mechanical keyboard. While it certainly isnât the fanciest mechanical keyboard on the market, it would allow me to test exactly how well the USB-to-Camera-Connection-Kit method would function in the real work.
The Rapoo V500 Mechanical Gaming Keyboard
Iâd never heard of Rapoo before, but their V500 keyboard covered all the bases. It is mechanical, relatively compact, and fully programmable. Best of all, at $59, it significantly undercuts every other Mac mechanical keyboard, and pretty much any mechanical keyboard.
Now to be clear, this keyboard doesnât technically have a Mac compatible layout. It is, however, fully programmable. Meaning if you plug it into a Windows PC and install the drivers, you can completely customize the key layout. Importantly, these layout changes are saved directly to the keyboardâs firmware, meaning you donât have to keep the drivers installed – critical, since the iPad obviously doesnât have drivers. Anyways, after setting up the keyboard and spending some time with it, I have good news and bad news.
The bad news: It doesnât work with the iPad using the Lightning to USB Adapter. It simply draws more power than that adapter is capable of providing. You can still use it with the iPad, but youâll first need to plug the keyboard into a powered USB hub, and then plug that hub into the Lightning to USB cable. Obviously not ideal for something thatâs supposed to be portable.
After jumping through those hoops, the iPad will pop up with an error message about the Rapoo keyboard being incompatibe. If you dismiss that message, however, they keyboard will work perfectly fine. All compatible function keys work perfectly, and there is zero lag anywhere. If I were setting up a stationary writing space, and didnât mind the USB hub requirement, Iâd be very happy with this keyboard.
The V500 is a mechanical keyboard with linear switches. Linear switches are different than the usual tactile switches found in mechanical keyboards. In effect, these switches donât have the âbumpâ or âclickâ feedback many typists are used to. Instead, the keys go down silky-smooth, activate about half-way down, and only make a noise if they key itself touches the base of the keyboard. Experienced mechanical keyboard touch-typists will probably never bottom out they keys, resulting in an incredibly smooth, whisper-quiet typing experience.
The good news: If youâre a fan of linear mechanical switches, the Rapoo V500 is a killer bargain. The keys feel outstanding, the fully-programable nature of the keyboard makes it perfect for both gamers and Mac users, and the price is pretty much impossible to beat. This isnât a viable keyboard for iPad users, but for computer users, this is an amazing find. At about $64.99 in both black and white, this is an EASY recommendation for PC gamers or Mac typists. Just not for the iPad.
The Rapoo KX
I was so impressed with the typing experience of the Rapoo V500, I decided to give another one of their keyboards a chance. The KX keyboard had potential; it uses the exact same yellow linear key switches as the V500, but features a fully wireless connection instead. Not bluetooth, sadly – it requires a small RF transmitter be plugged in via USB. However, the keyboard itself draws power from an integrated battery, rather than from USB. Meaning all the iPadâs Lightning to USB adapter would need to power is the tiny RF transmitter. Worth a shot, right?
I really, really wanted this to work. The build quality of the KX is outstanding, with the face plate constructed out of a solid piece of brushed stainless steel. The keys have flatter, more laptop-style surfaces, but feature the exact same switches as the V500, and are just as pleasant to type on. And unlike the V500, theyâre fully backlit. The function keys are a strange, touch-sensitive design, but the keyboard provides haptic feedback via an integrated vibration motor when you touch them – an odd design decision, but it works, since F keys are rarely used.
Sadly, it just doesnât work with the iPad. The RF transmitter simply requires too much power for the Camera Connection Kit. That would itself be a deal killer for me, but thereâs another problem. Unlike the Rapoo V500, the Rapoo KX is not fully programmable. Only the virtual F-keys can be programmed. This means thereâs no way to switch the Windows and Alt keys to the Mac layout.
To be honest, if everything else about this keyboard worked with the iPad, Iâd be willing to overlook the backwards key mapping. Itâs that good. $80 seems like a lot for a keyboard, but in this case itâs an absolute steal. Finding a backlit, wireless, mechanical, metal keyboard for $80 is virtually unheard of. The KX isnât the keyboard for my needs, but there is a very good chance this is a dream keyboard for anyone trying to set up a gaming PC in the living room or find a perfect keyboard to connect to the Microsoft Surface tablet. If that applies to you, the Rapoo KX is available for about $83 in both white and black. If Rapoo ever makes a bluetooth, Mac version of this keyboard, Iâll buy it immediately.
The Matias Laptop Pro Keyboard
At this point, the list of Mac-compatible small mechanical keyboards was rapidly dwindling. I wasnât willing to spend a bunch of money ordering a custom Mac keyboard from a boutique manufacturer with the hope that it would work with the Camera Connection Kit. Luckily, there was one option left for a small, bluetooth Mac keyboard. Literally one single option. Enter the Matias Laptop Pro keyboard.
The Laptop Pro keyboard seems to fit the bill perfectly. Itâs a fully bluetooth keyboard with a Mac key layout. It uses high-quality mechanical switches. Best of all, it is specifically advertised as being compatible with iPad – no Camera Connection Kit required!
Thereâs one big downside: at $159, the Laptop Pro keyboard is literally twice the price of any other keyboard on this list. Itâs an undeniably a high price to pay for a keyboard, but believe it or not, $160 is not an insane price for a mechanical keyboard. Mechanical gaming keyboards regularly costs above $100, and boutique keyboards like this regularly pass the $150 or $200 mark. Which, by the way, should reinforce just what a great deal those Rapoo keyboards were. Anyways, after coming this far, I wasnât finishing this review without trying the one keyboard that seemed to fit the bill perfectly.
Iâm happy to report that the Matias Laptop Pro is exactly what I was hoping it would be. After a quick, painless Bluetooth pairing, the keyboard started working immediately on the iPad – no warning messages, no wonky adapters. Compatible function keys work perfectly, the dedicated forward-delete key works as it should⦠I canât really ask for much more. Itâs a little unfortunate that there is no dedicated iOS home button / search / virtual keyboard functionality, but itâs not a deal killer.
Visually, Iâll be blunt: this keyboard is a bit of a mess. Everything about it looks cheap, from the plastic painted to look like metal to the grainy looking keys with too much lettering on them. A highly visible seem runs along the sides of the keyboard where the pieces of plastic connect. For an Apple inspired product, Matias makes some aesthetically horrendous design decisions. Nothing about this looks like $160.
But Iâm getting ahead of myself. Looks are nice, but functionality is why youâd get a mechanical keyboard. The typing experience of the Matias Laptop Pro is perhaps itâs most interesting aspect, and it puts this keyboard in a relatively unique position. Rather than using the ubiquitous Cherry switches (and Cherry-style) switches common to PC gaming keyboards and clicky keyboards (including the Rapoo products mentioned above), the Matias Laptop Pro uses a completely different switch with a completely different feel.
These switches are based on switches from Alps, a defunct switch maker responsible for the switches used in Appleâs excellent â90s keyboards, among many others. These switches are mechanically very different from Cherry-style switches. Without getting into too much detail, the âfeelâ of the tactile bump Alps switches provide is more accurate to where they key press is actually registered. At the same time, the keys themselves have a bit more of a wobble to them compared to Cherry switches. These particular keys are of the âquietâ variety. The term âquietâ should be interpreted loosely – while these keys lack additional noise-making components, the very nature of big mechanical keys means this is by far the loudest keyboard in this article. If you type with a lot of force in a crowded setting, youâre going to find yourself getting sideways glances from people nearby.
I have a lot of experience with these switches. Iâve been a Mac user all through the ’90s, and I still have a classic Alps-powered Apple Extended keyboard. Having these keys on the iPad is like a breath of fresh air. It really is that much better than scissor-keys. Iâm still not sure where I stand on the Alps vs Cherry debate, but considering this Alps keyboard is the only option for Mac-format bluetooth keyboards, Iâm satisfied with this one.
Other Options
As covered above, there arenât a lot of options when it comes to mechanical keyboards on iOS. If you arenât looking for a portable keyboard, any gaming keyboard should work, as long as you donât mind connecting to a powered USB hub via the Camera Connection Kit.
If you are looking for a portable keyboard, but donât care about having Mac-format keys, Japanese manufacturer Filco makes some interesting products. Unlike Matias, these bluetooth keyboards use Cherry switches, and come in a variety of different styles with varying key noise and tactility. The PC layout makes these a non-starter for me, but Windows users might want to give them a look; theyâre tempting.
Conclusion
Before ending this review, Iâd like to reiterate one more time: for most people out there, the $20 Amazon Basics keyboard is perfectly fine. Heck, for extremely casual use, the touch screen on the iPad gets the job done. But those arenât the best options. The best options were what I set out to discover, and I wound up with THREE great choices in three different styles.
The Logitech Ultrathin Keyboard Cover is the best keyboard cover Iâve ever used. The build quality is outstanding and the keys are springy and responsive. The only downside: itâs been replaced with a far, far crappier model. This means finding the Ultrathin Keyboard Cover might be difficult. Still, it also means blowout clearance prices. I got mine for $35 on Amazon – 1/3 the price the replacement model goes for.
If you find the keyboard form-factor too small, but are still looking for something ultra portable, the Logitech Easy Switch is the best by far. Unbelievably great build quality with an aluminum face plate, extremely responsive keys with full backlighting, and three-device pairing with quick switching. These keyboards generally go for $99, but you can probably find one cheaper if you look hard enough – mine was $40 at Office Max.
When it comes to mechanical keyboards, thereâs really only one option that works well with the iPad: the Matias Laptop Pro. It may be ugly, but it feels amazing. Using a mechanical keyboard is an entirely different experience from using anything else. If thatâs the experience you desire, the Matias Laptop Pro is worth every penny of itâs $159 price tag.
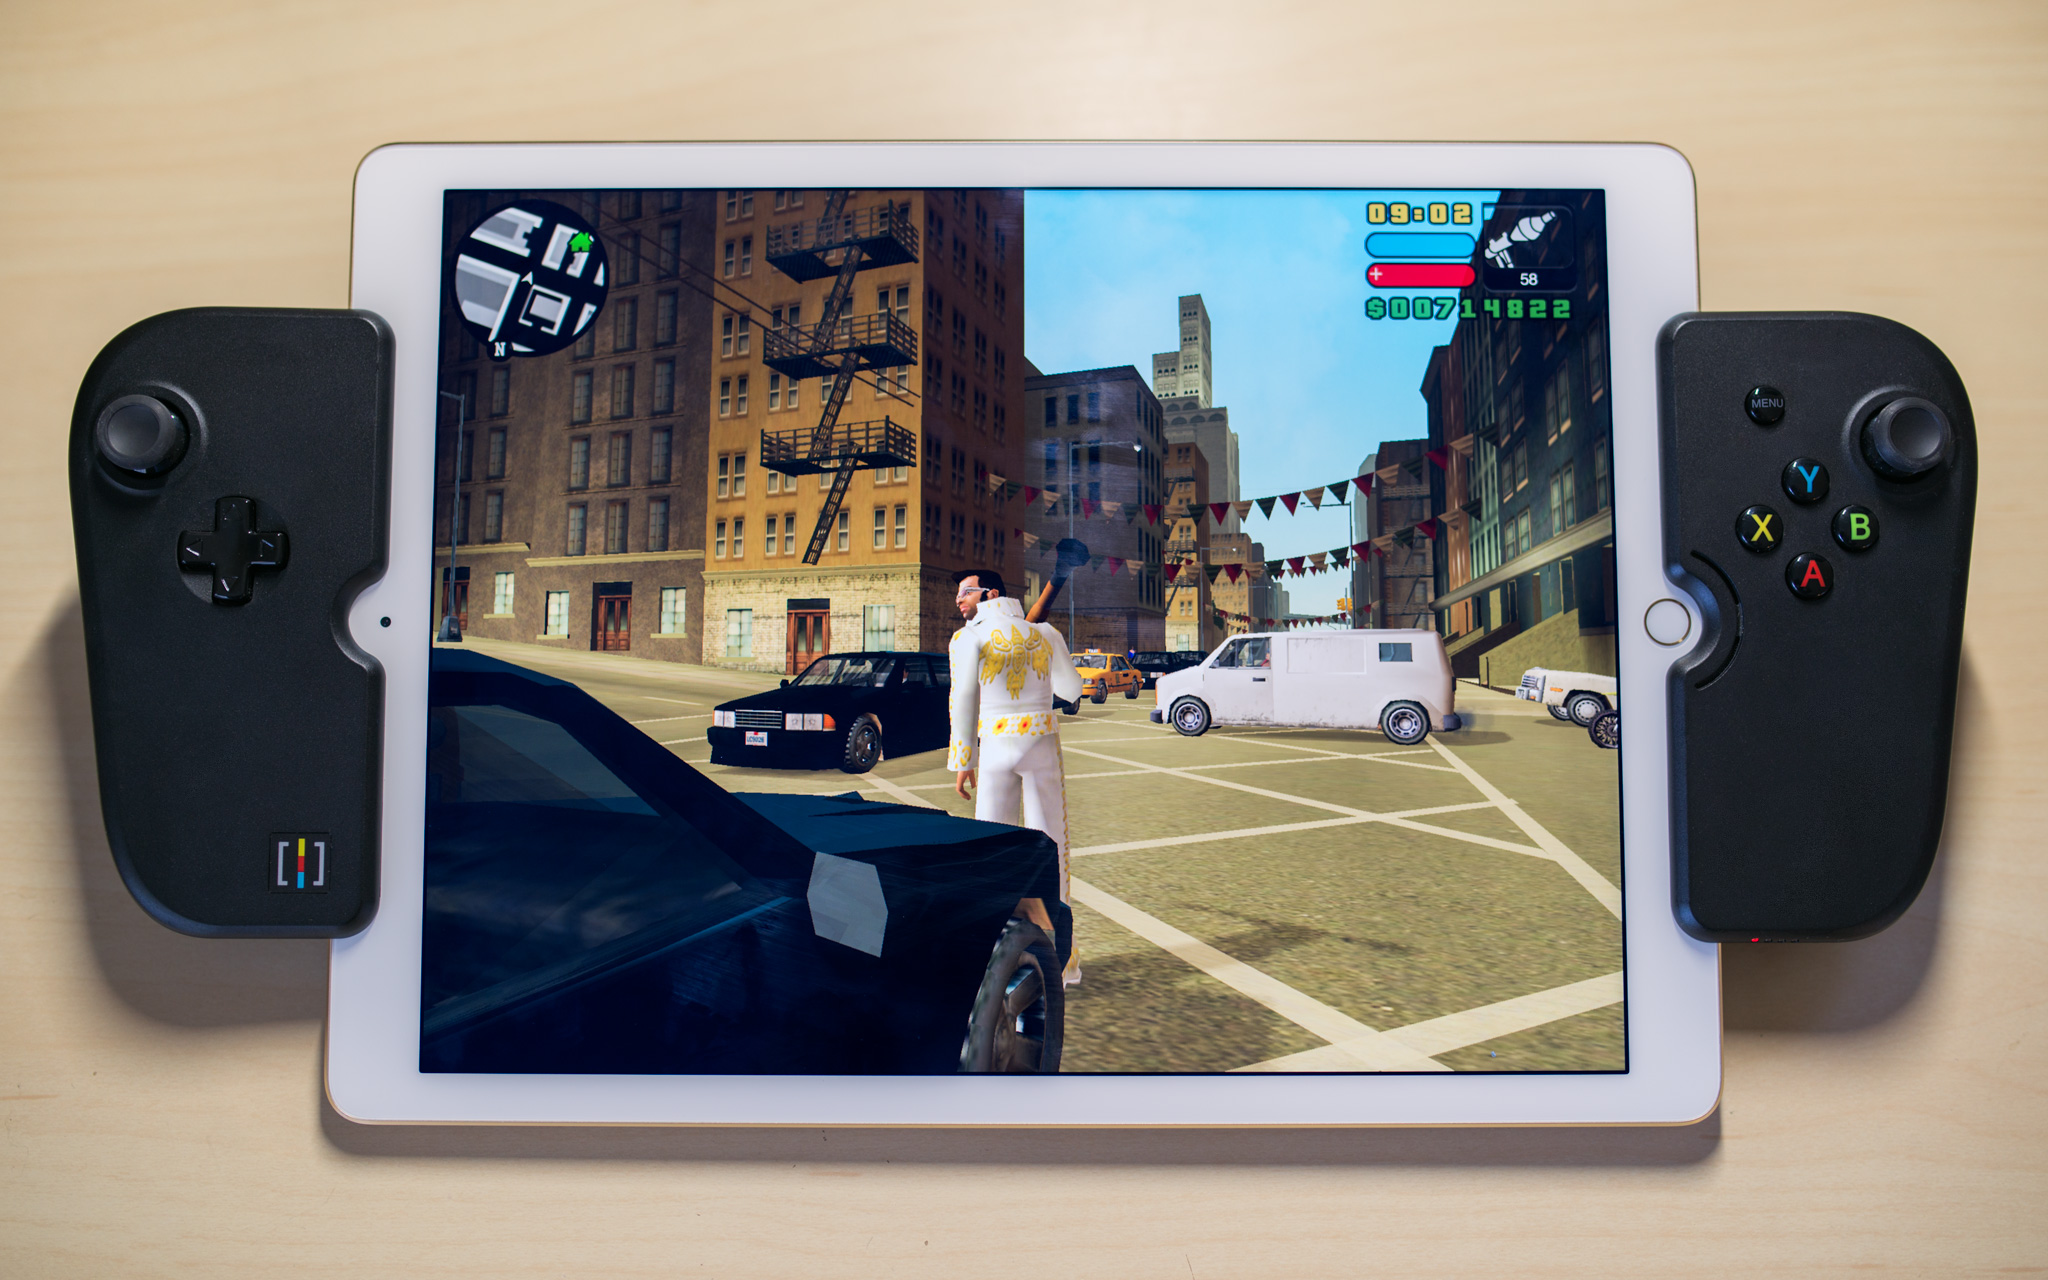


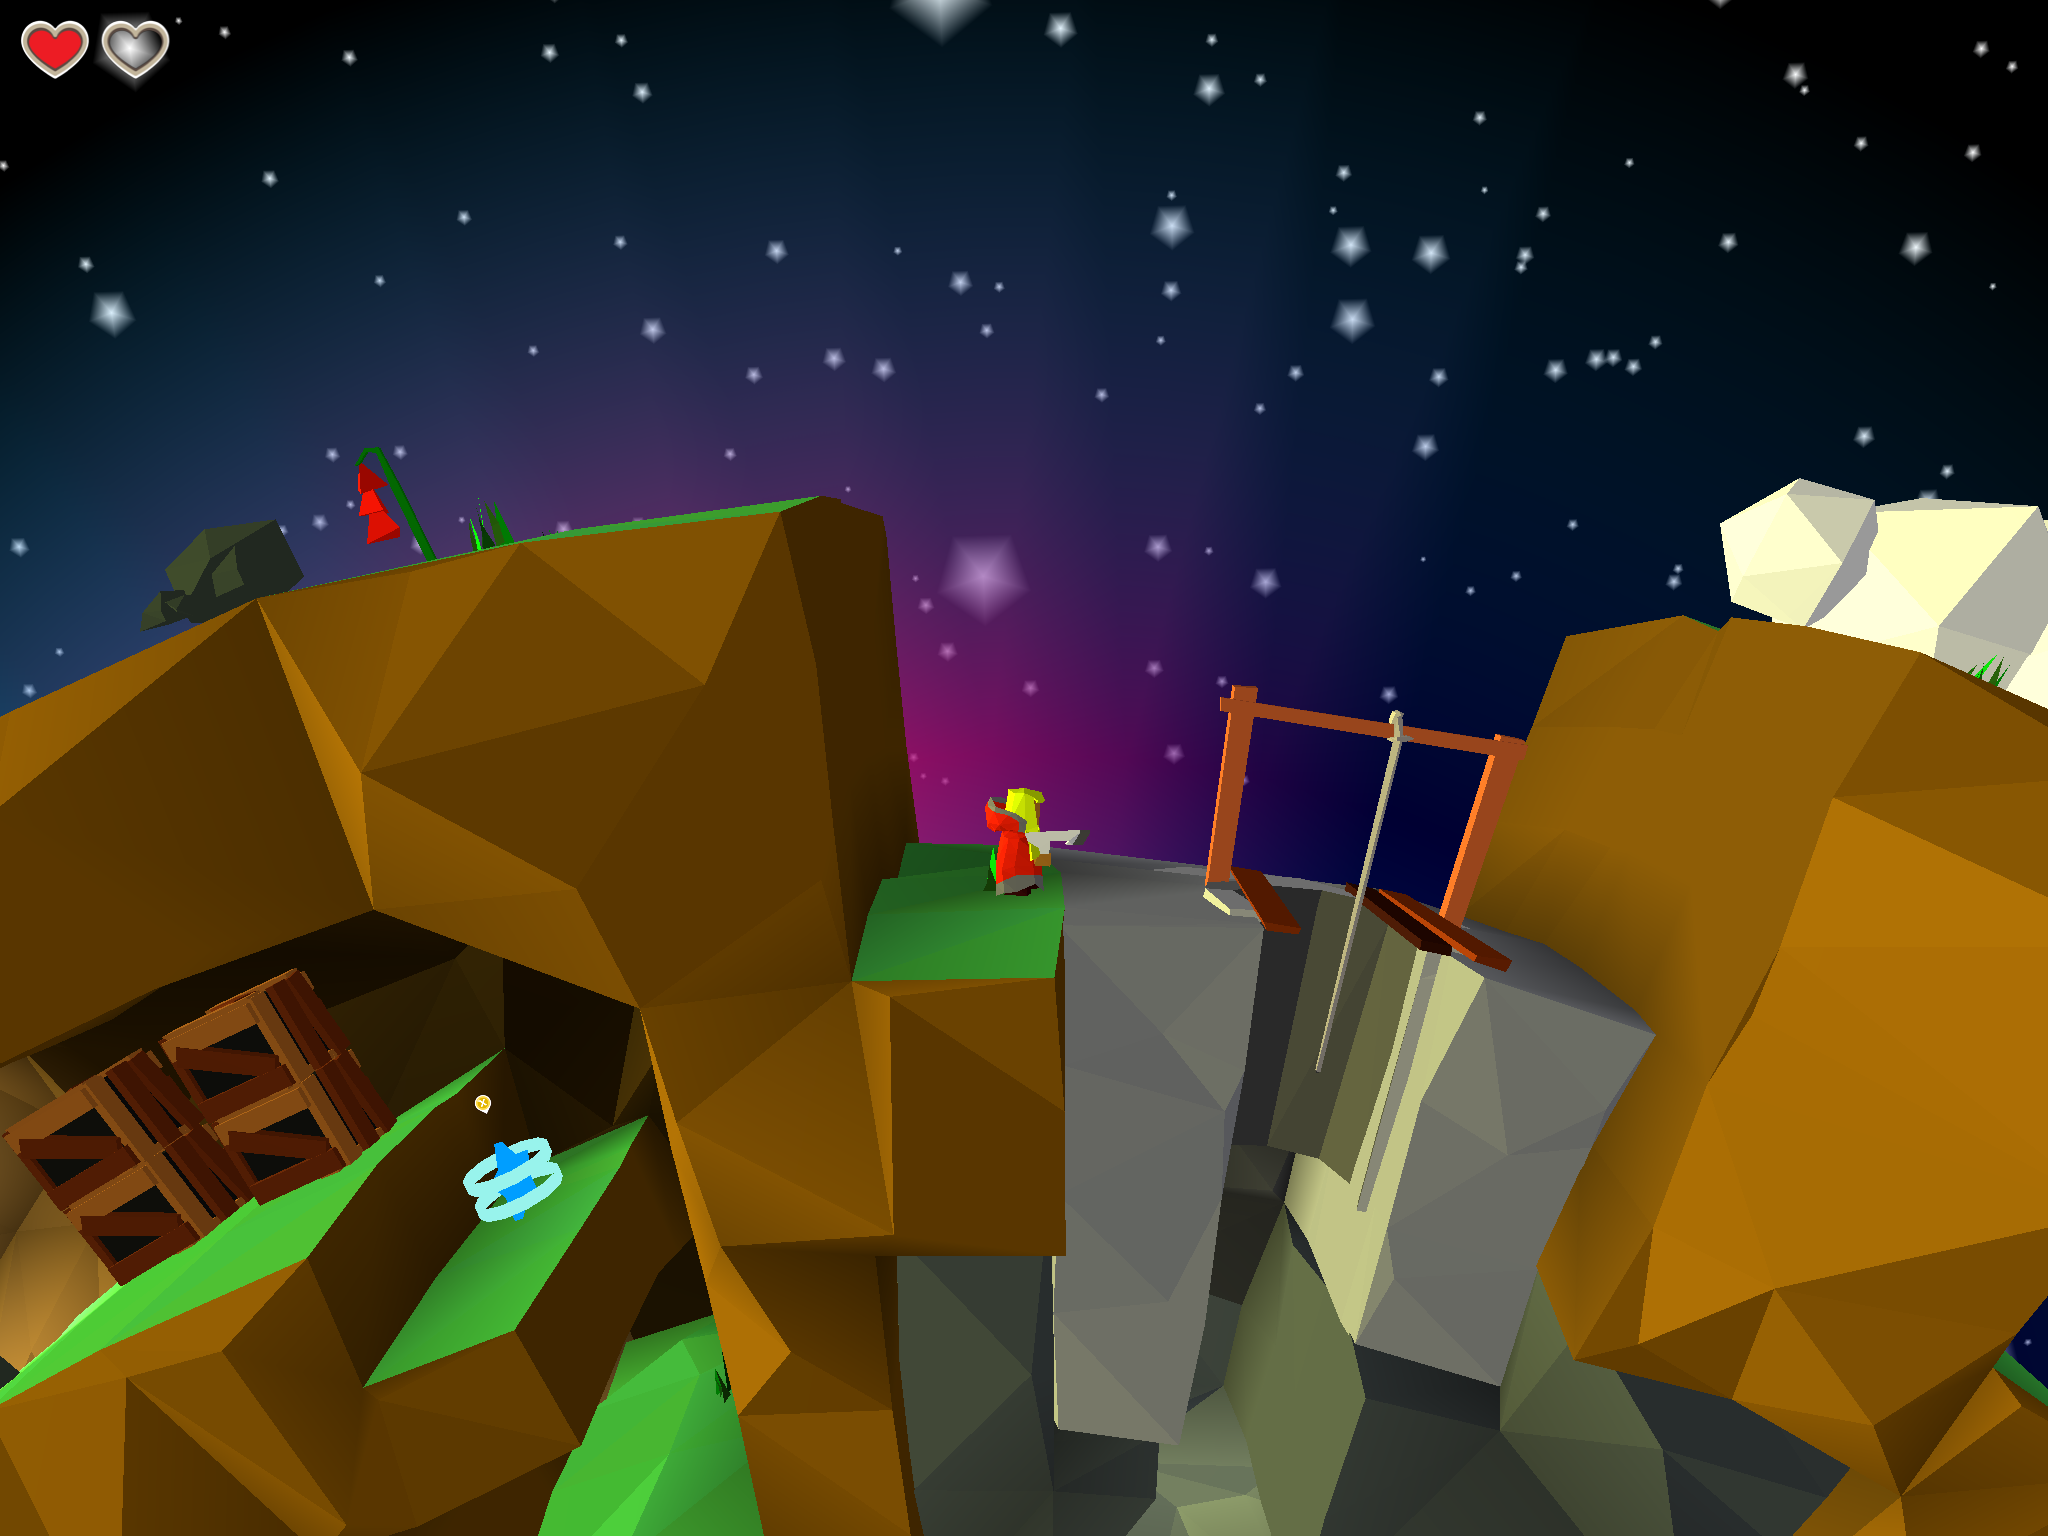
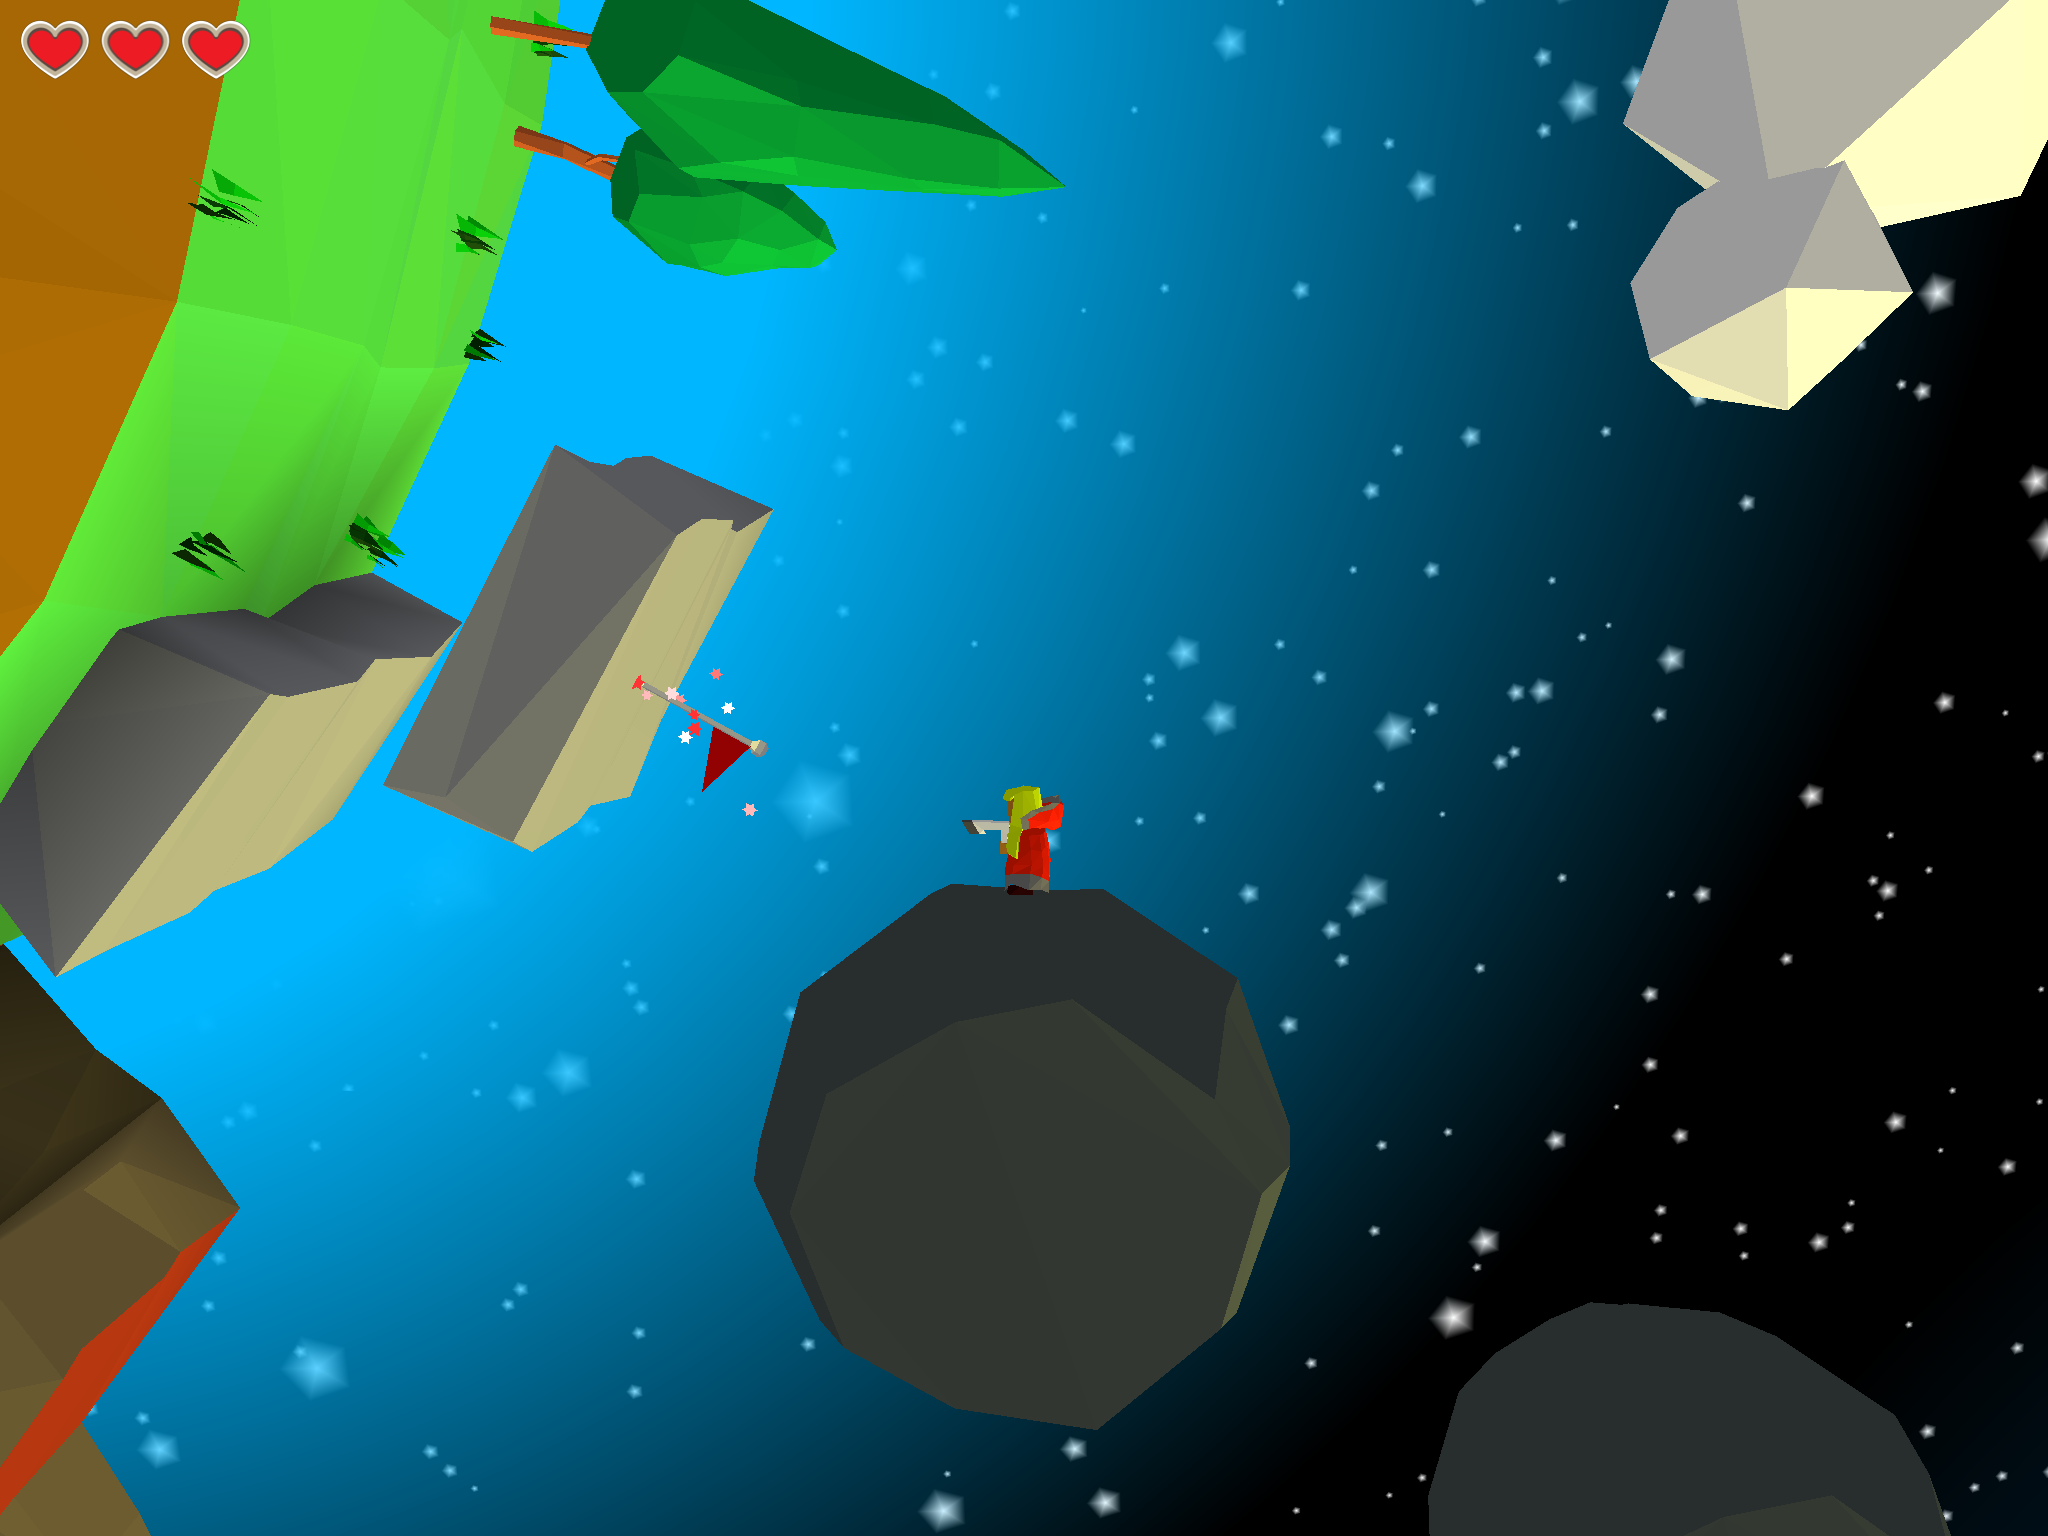

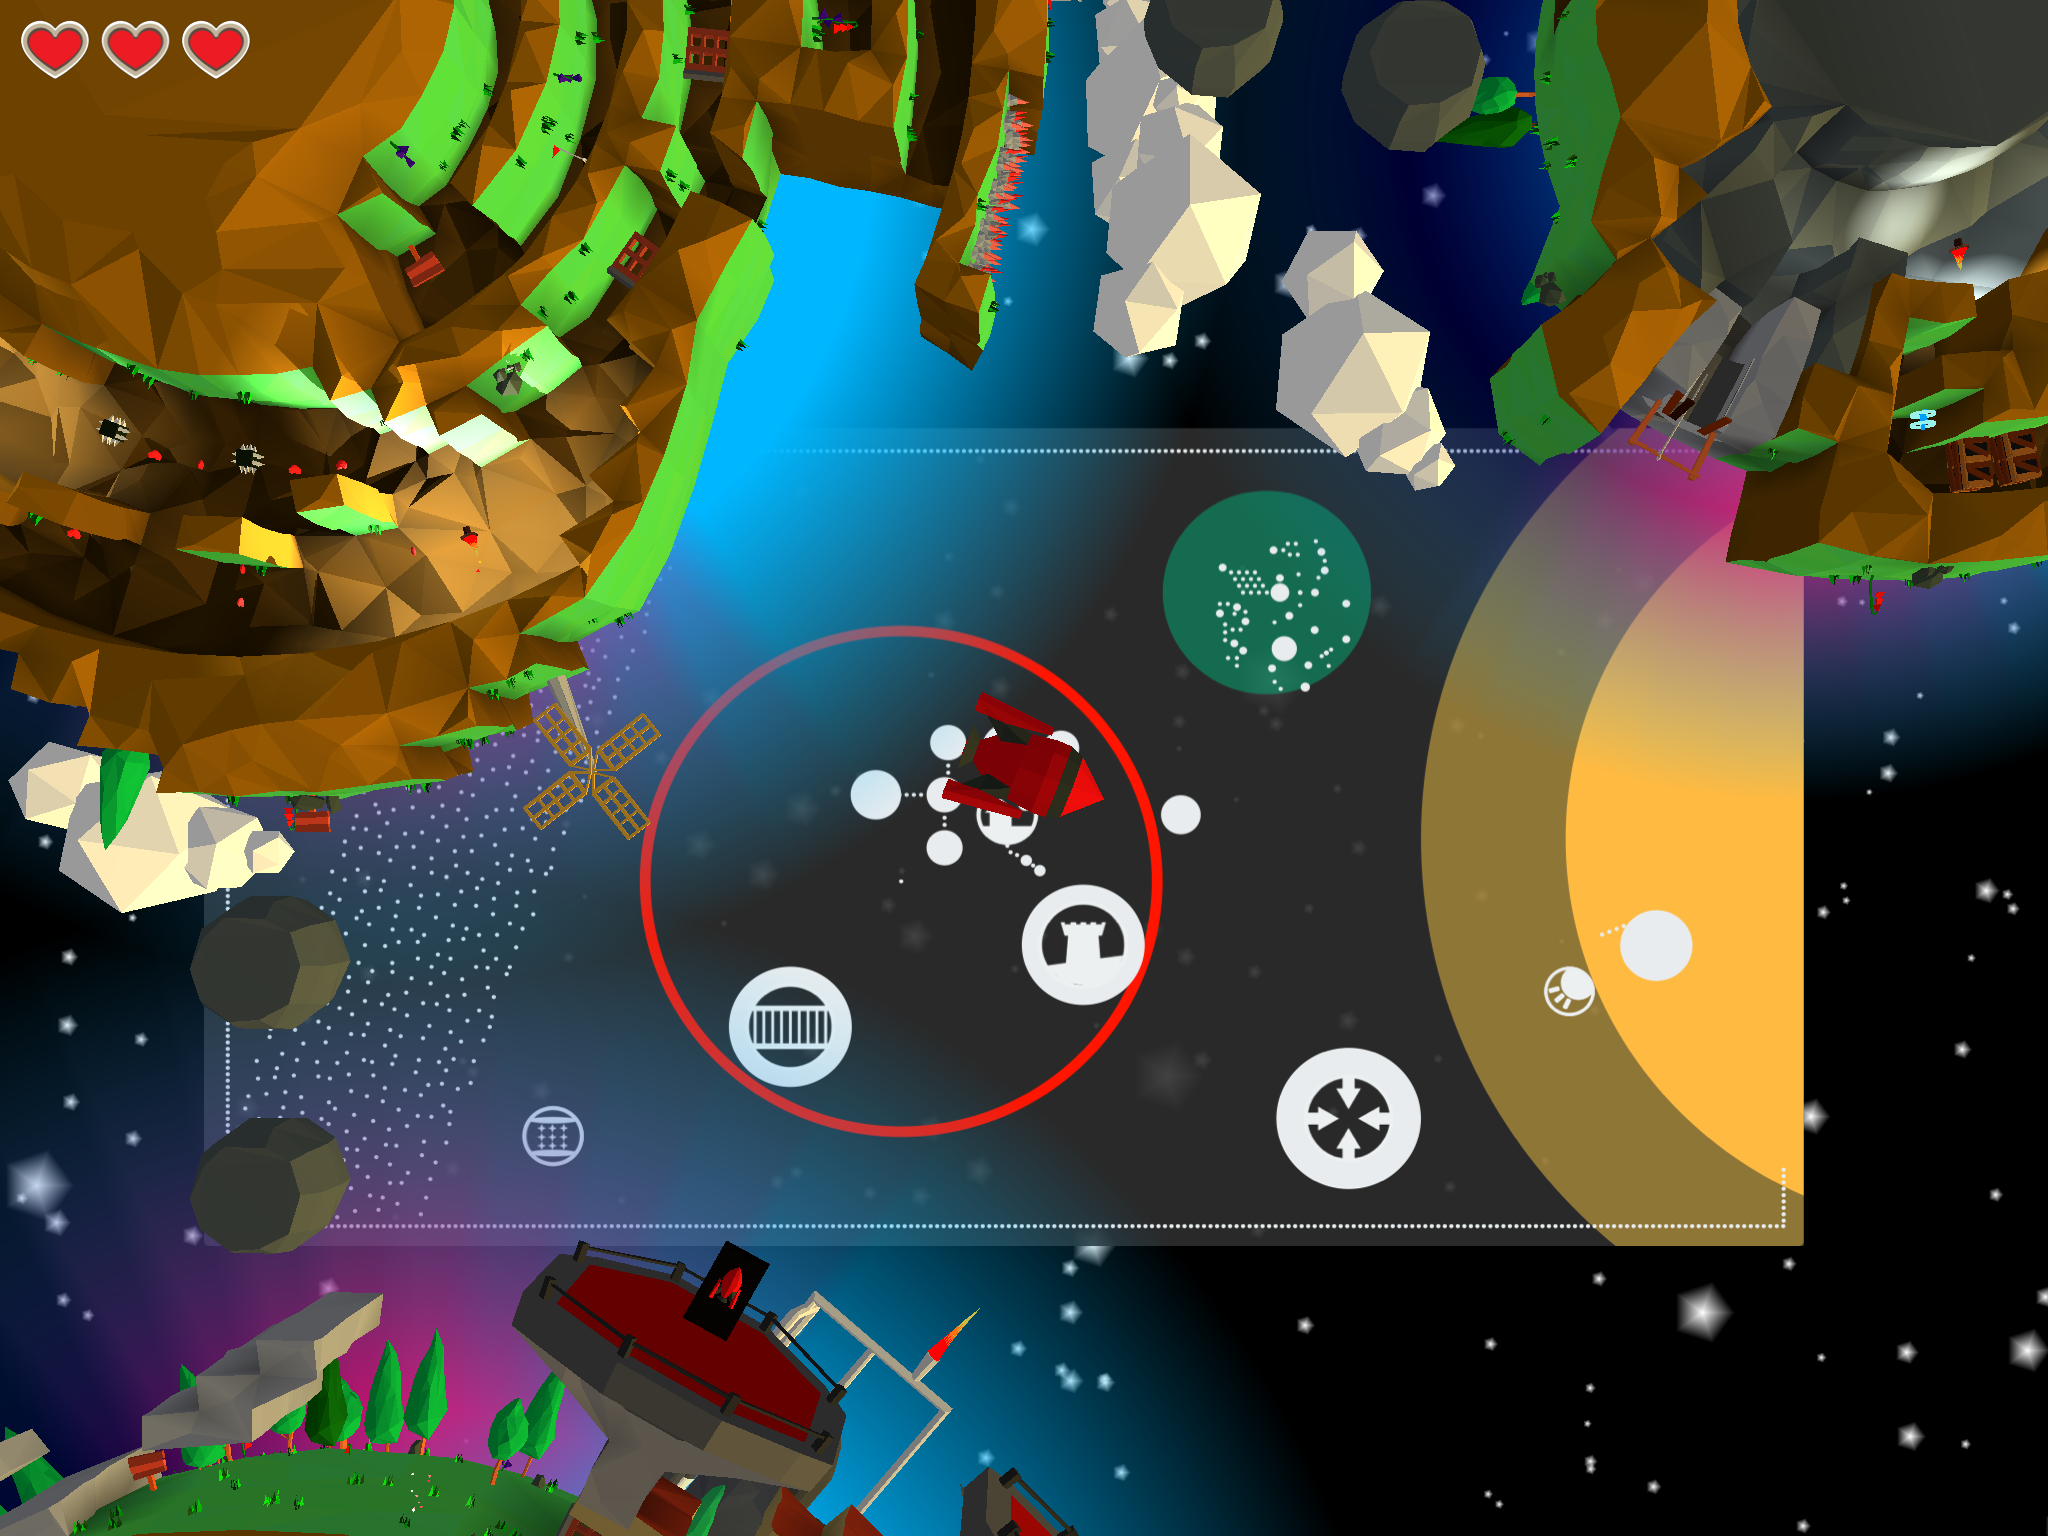
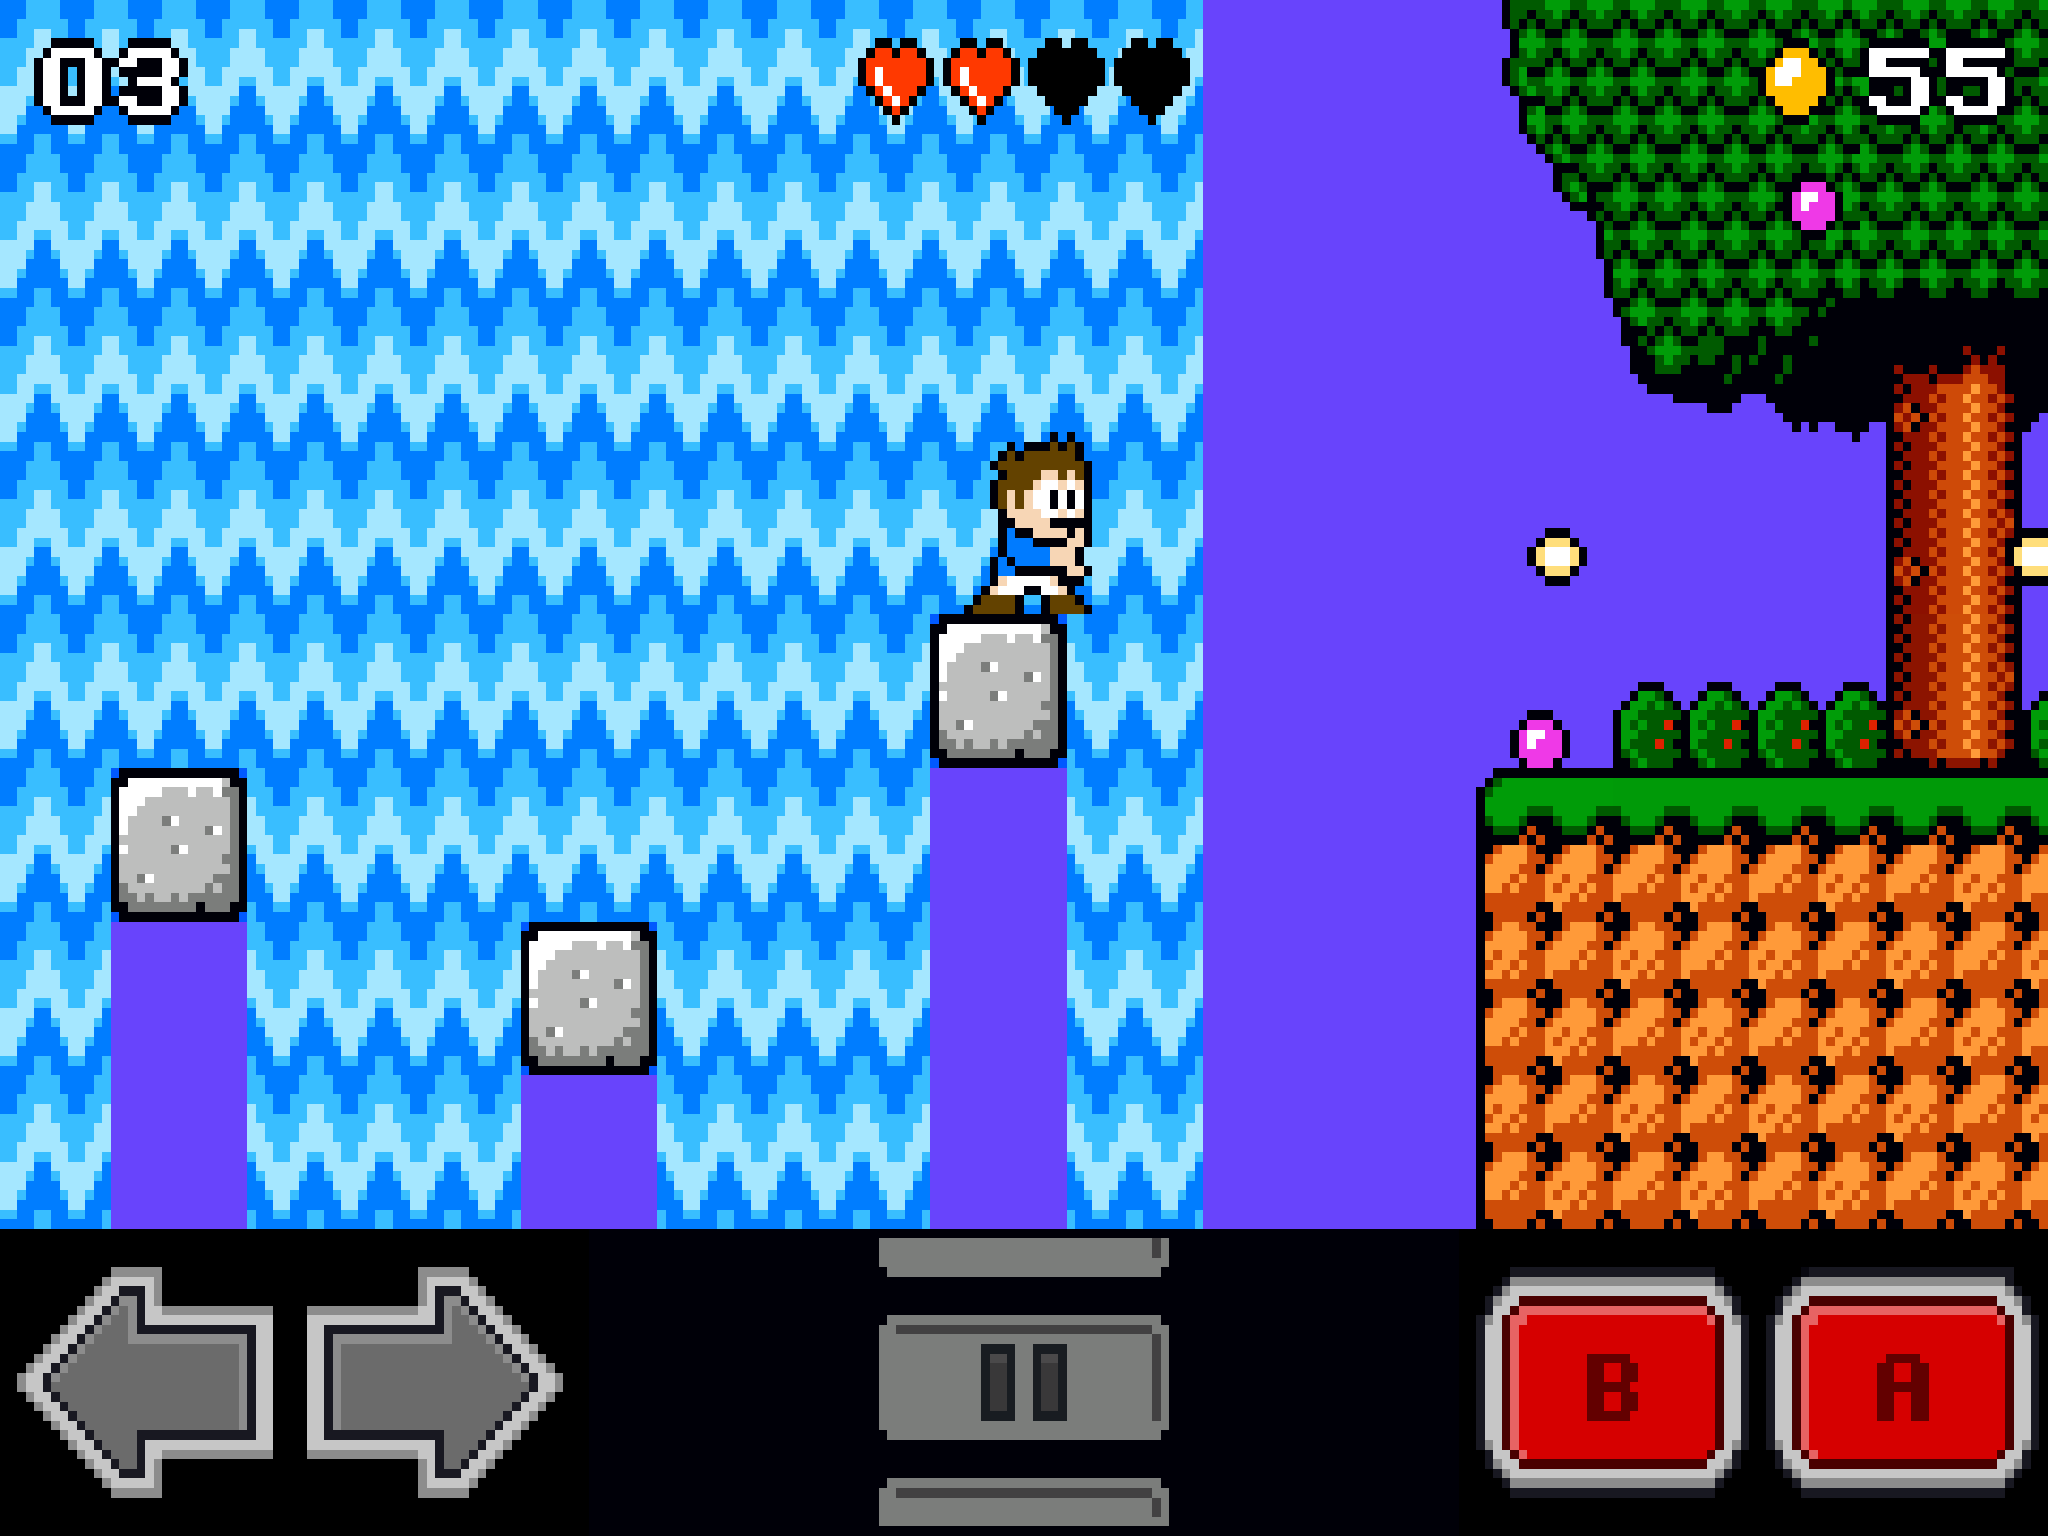
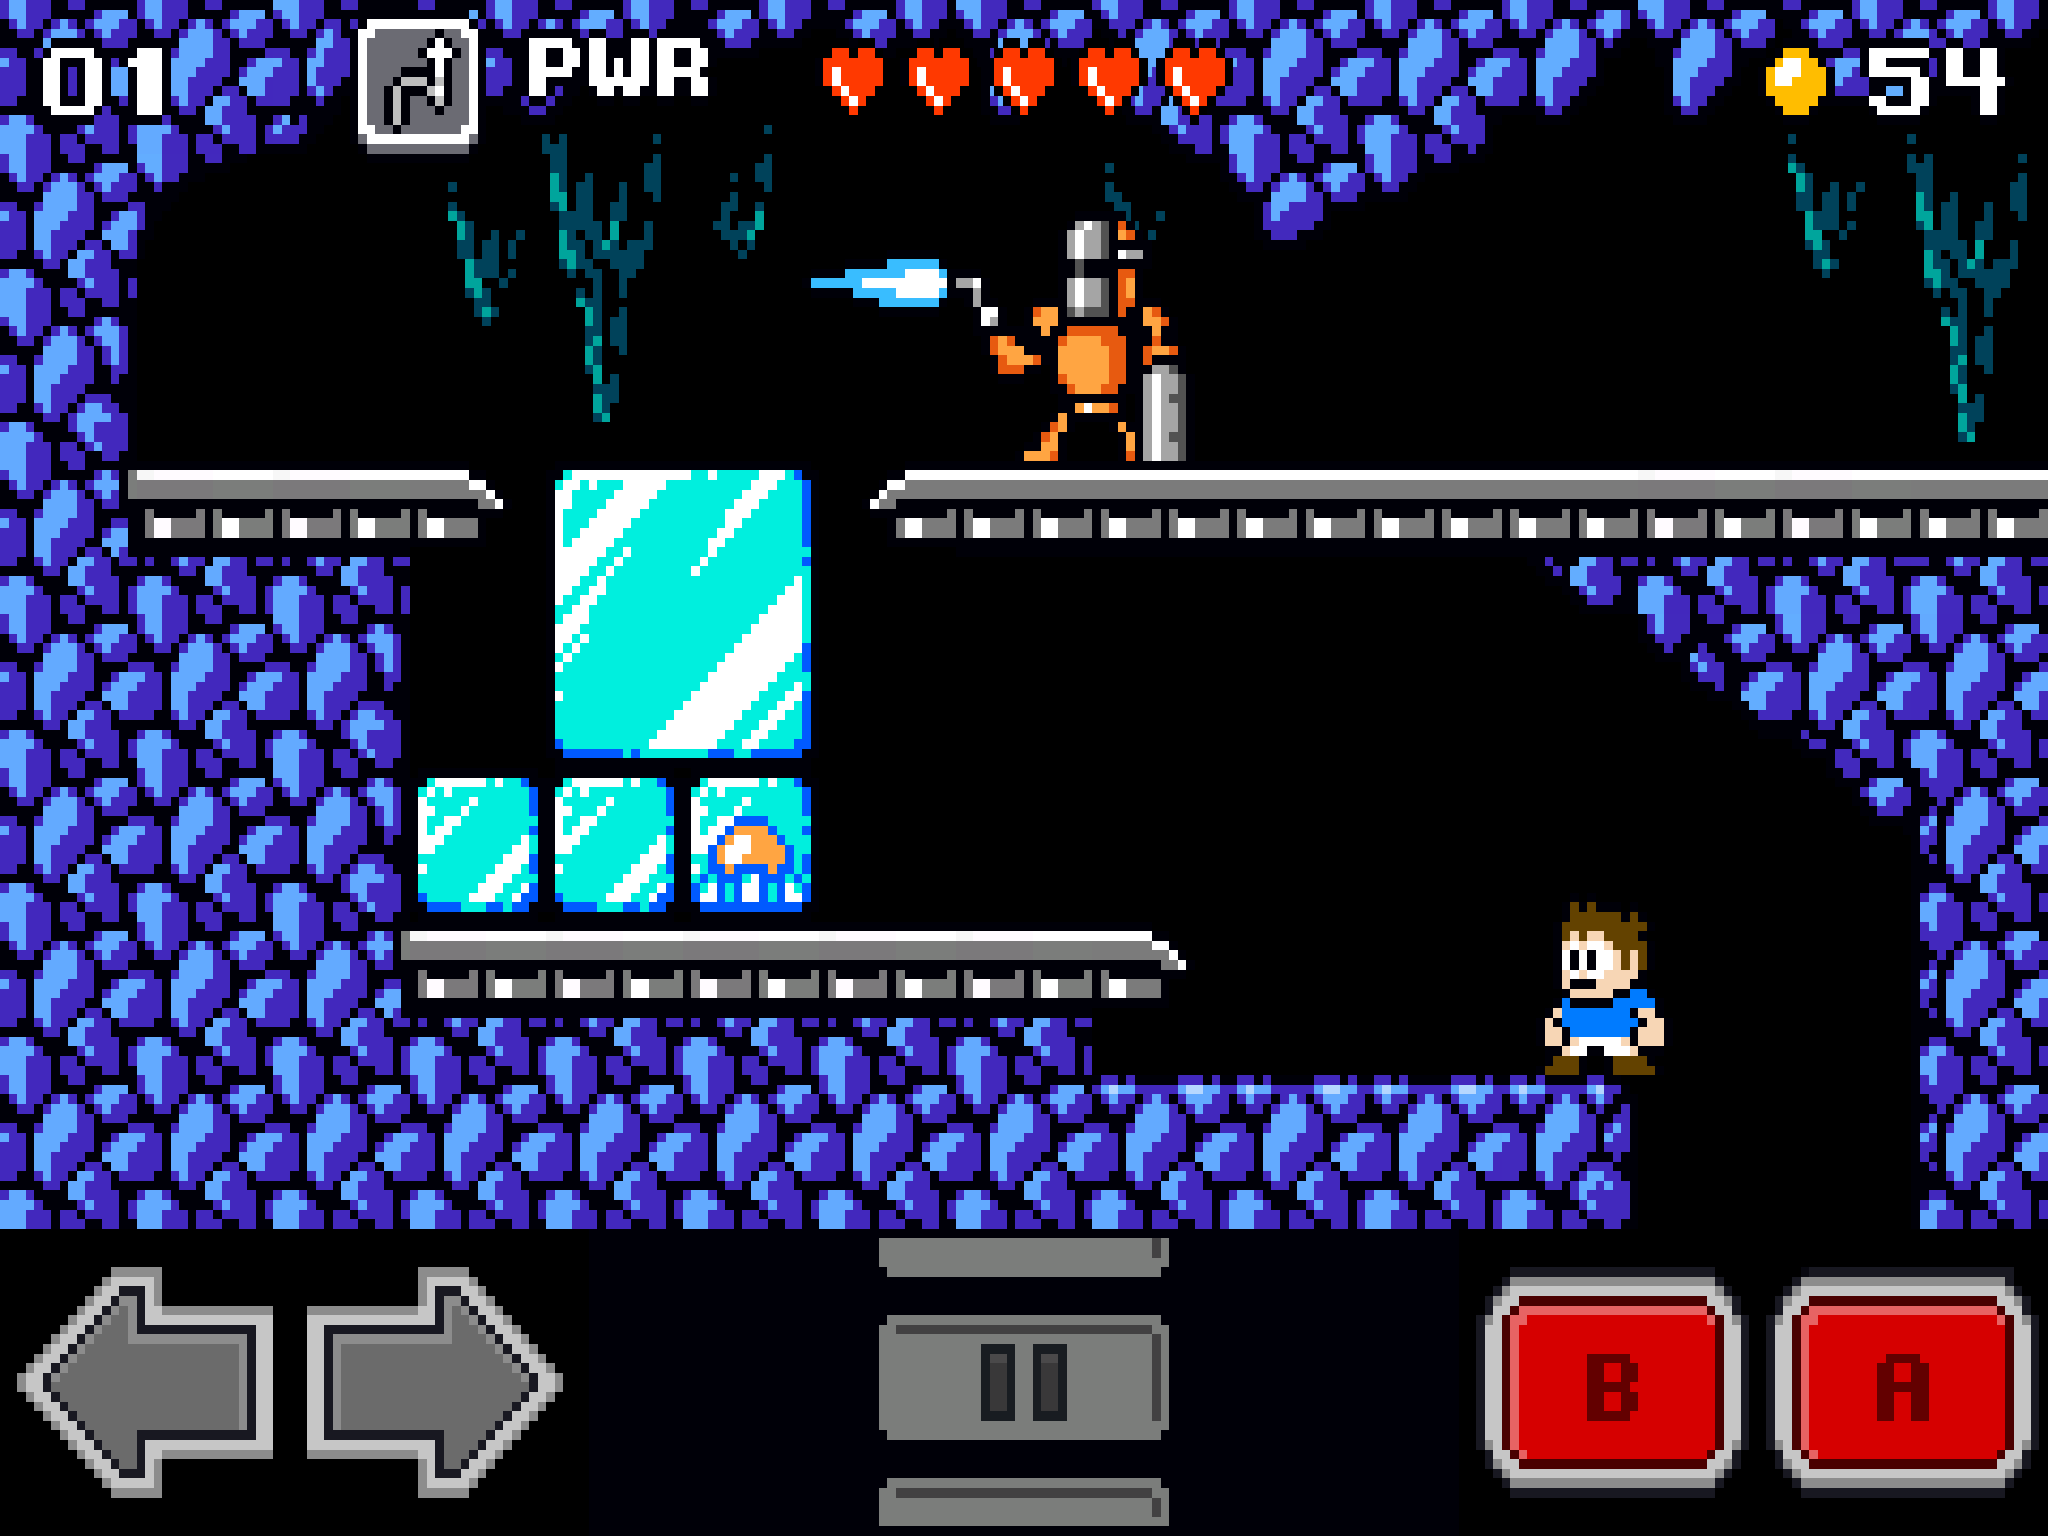


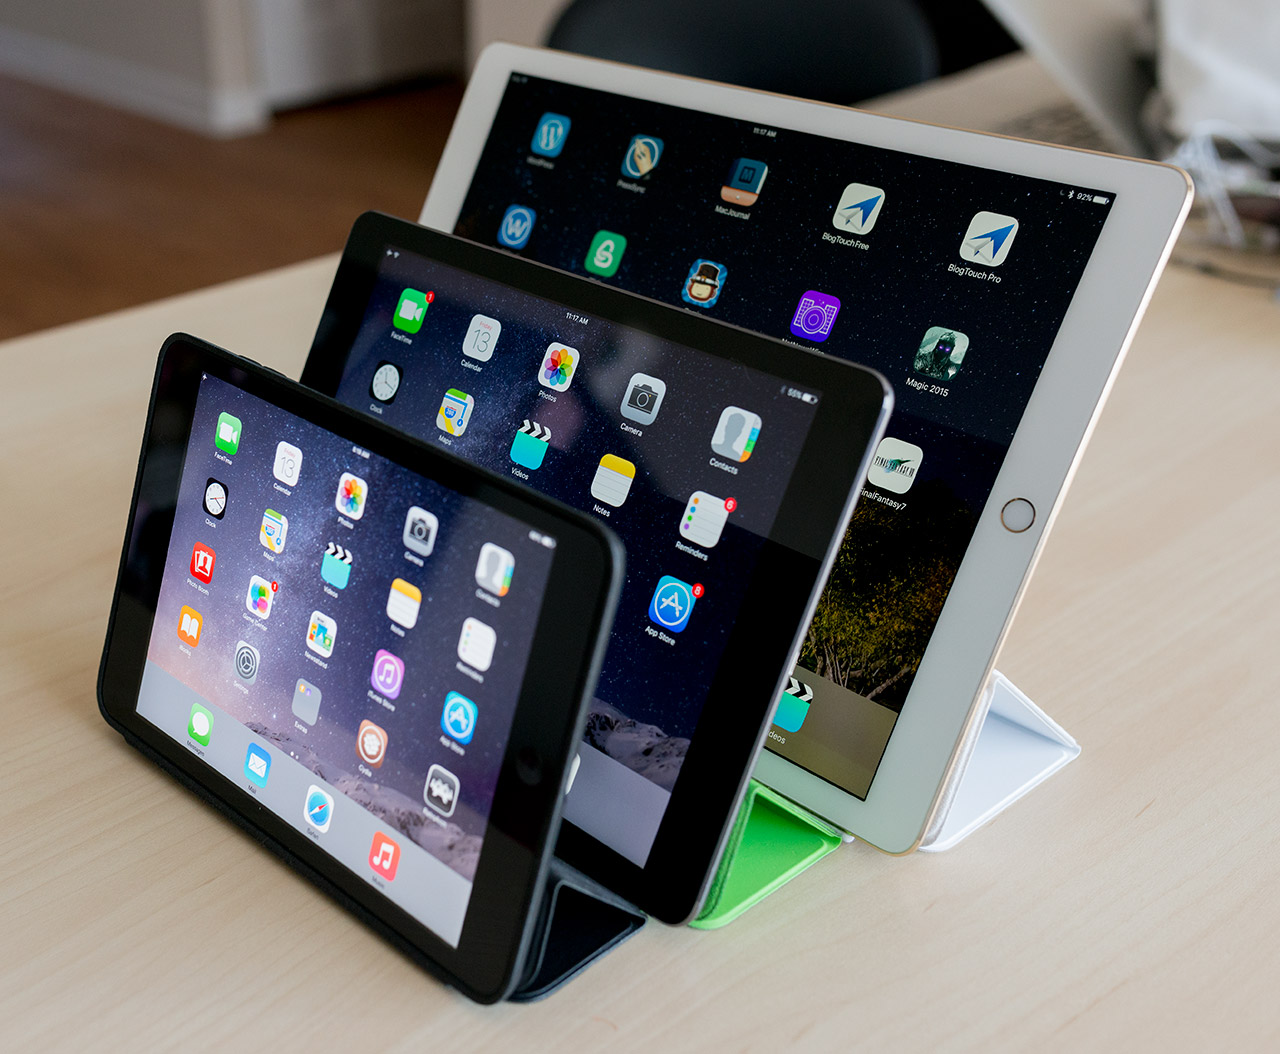


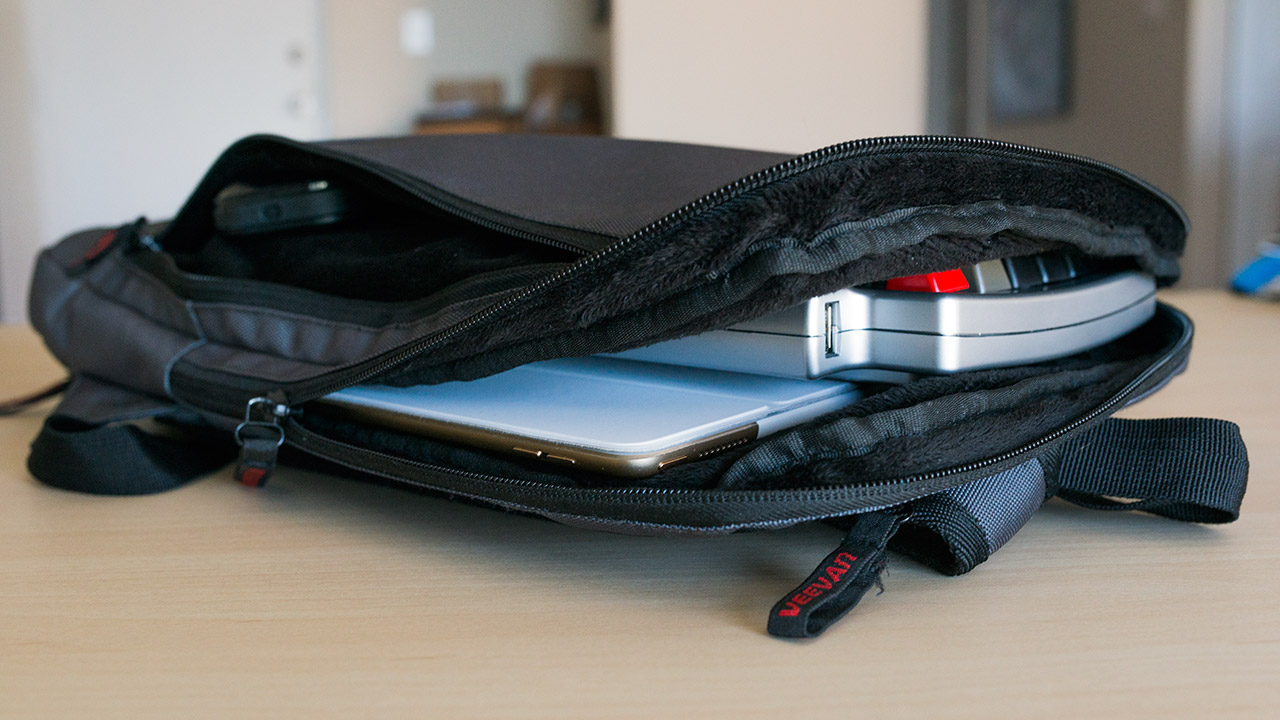
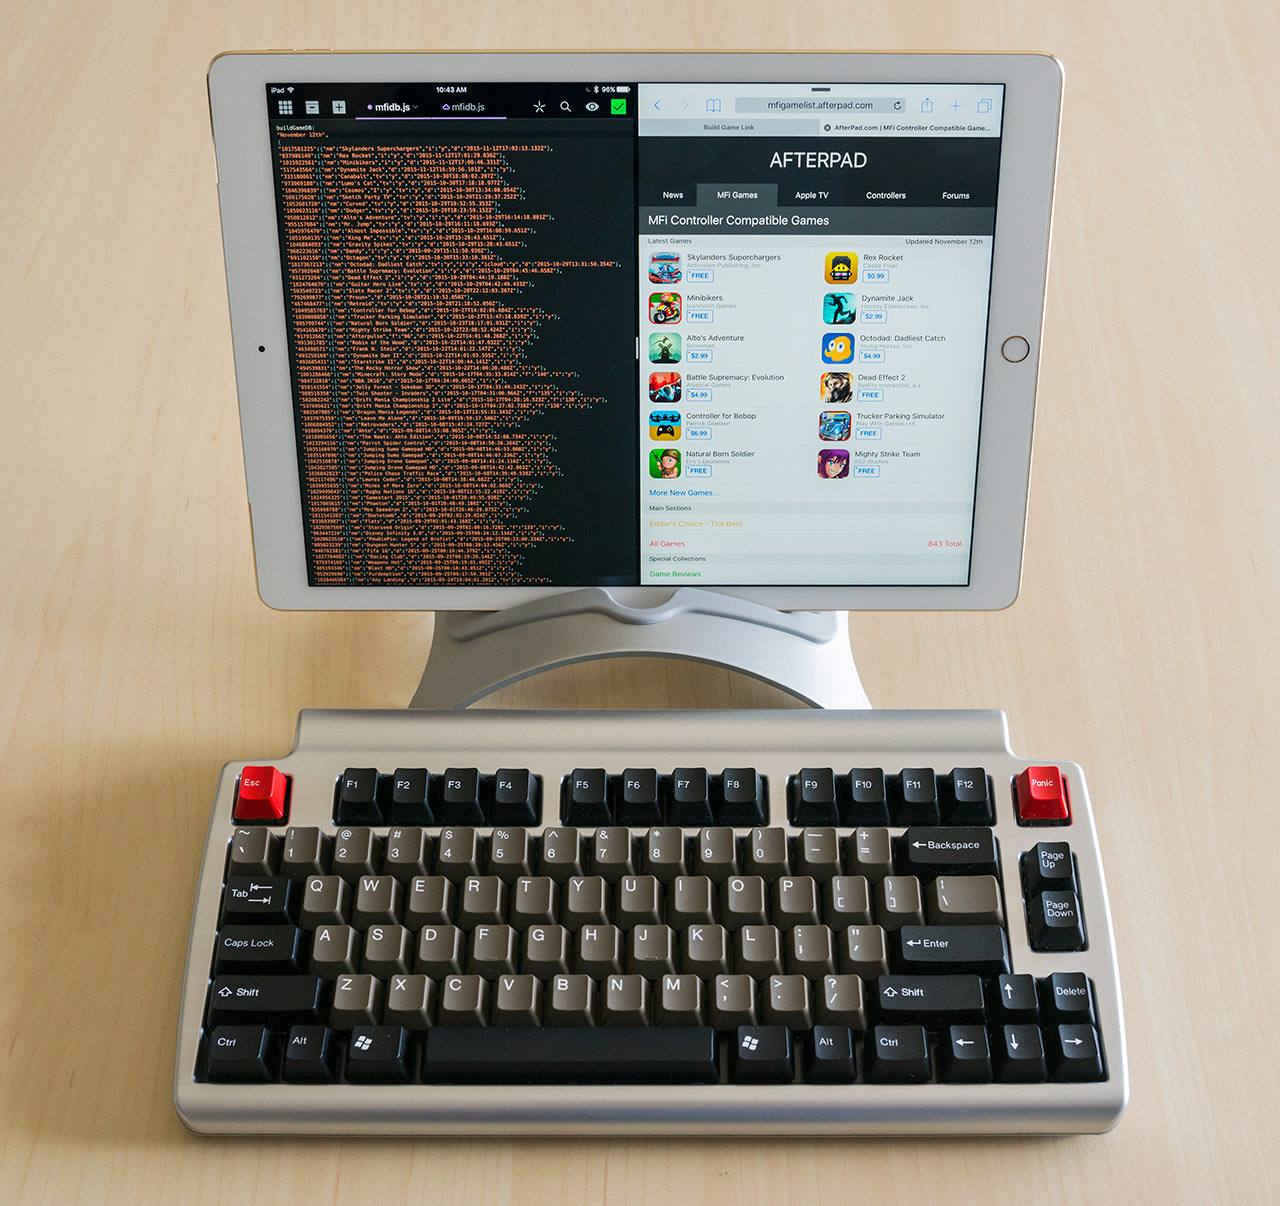
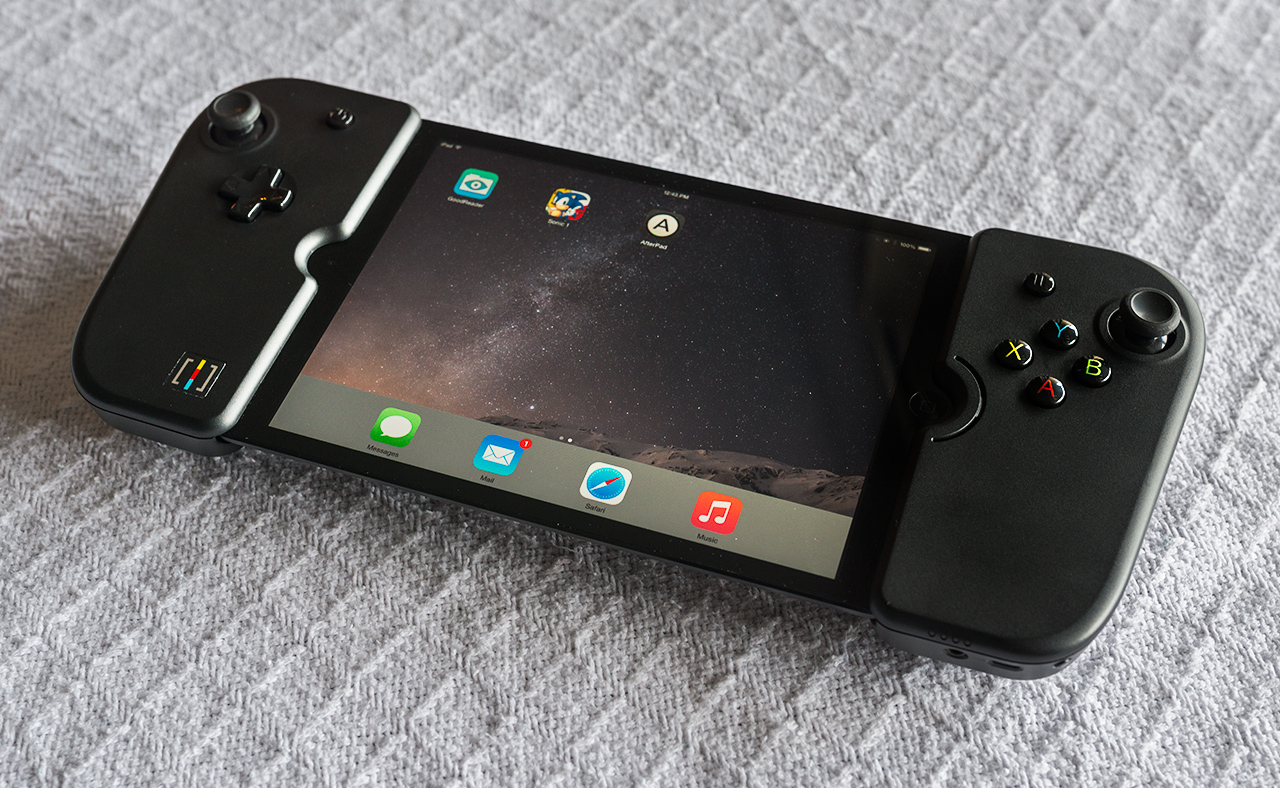


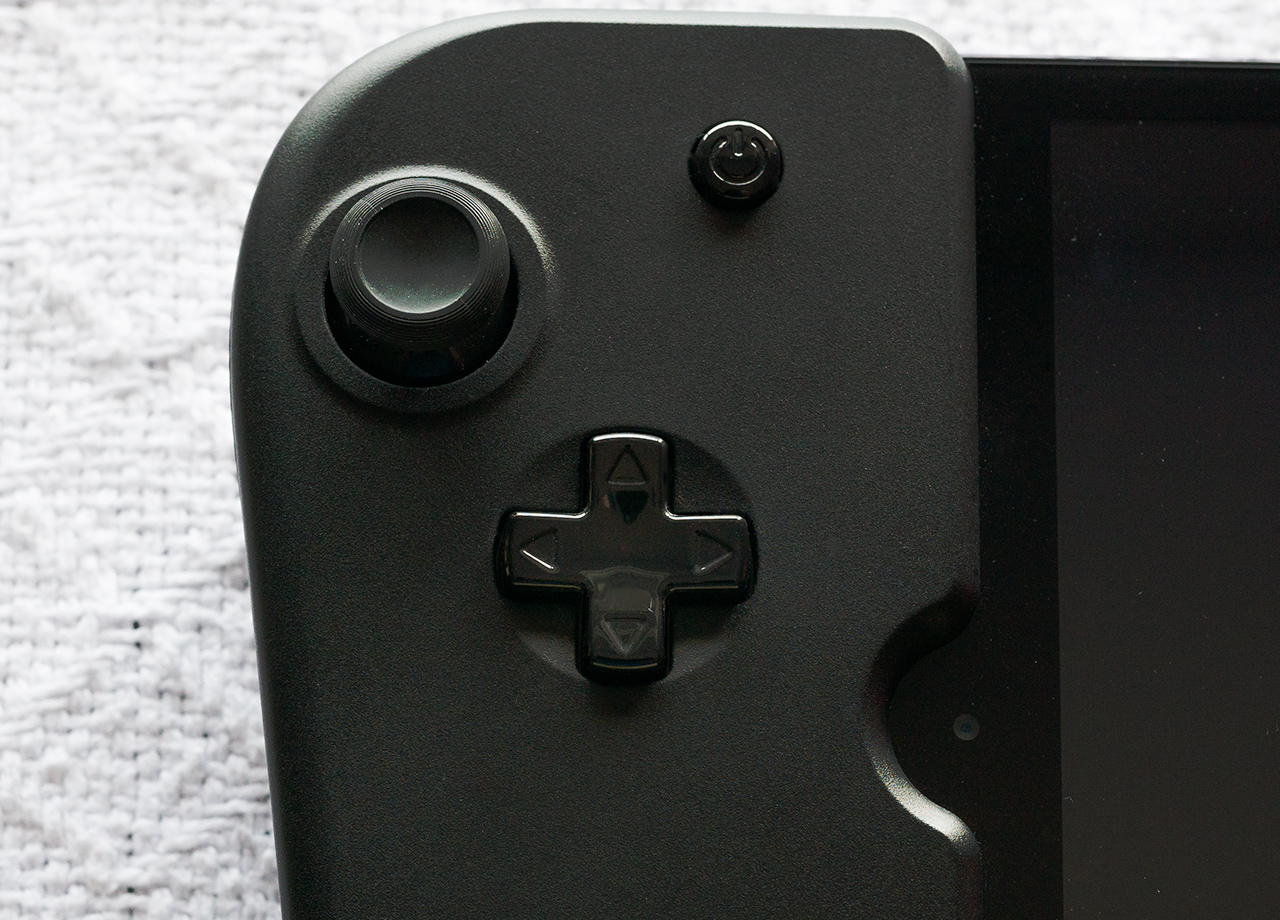

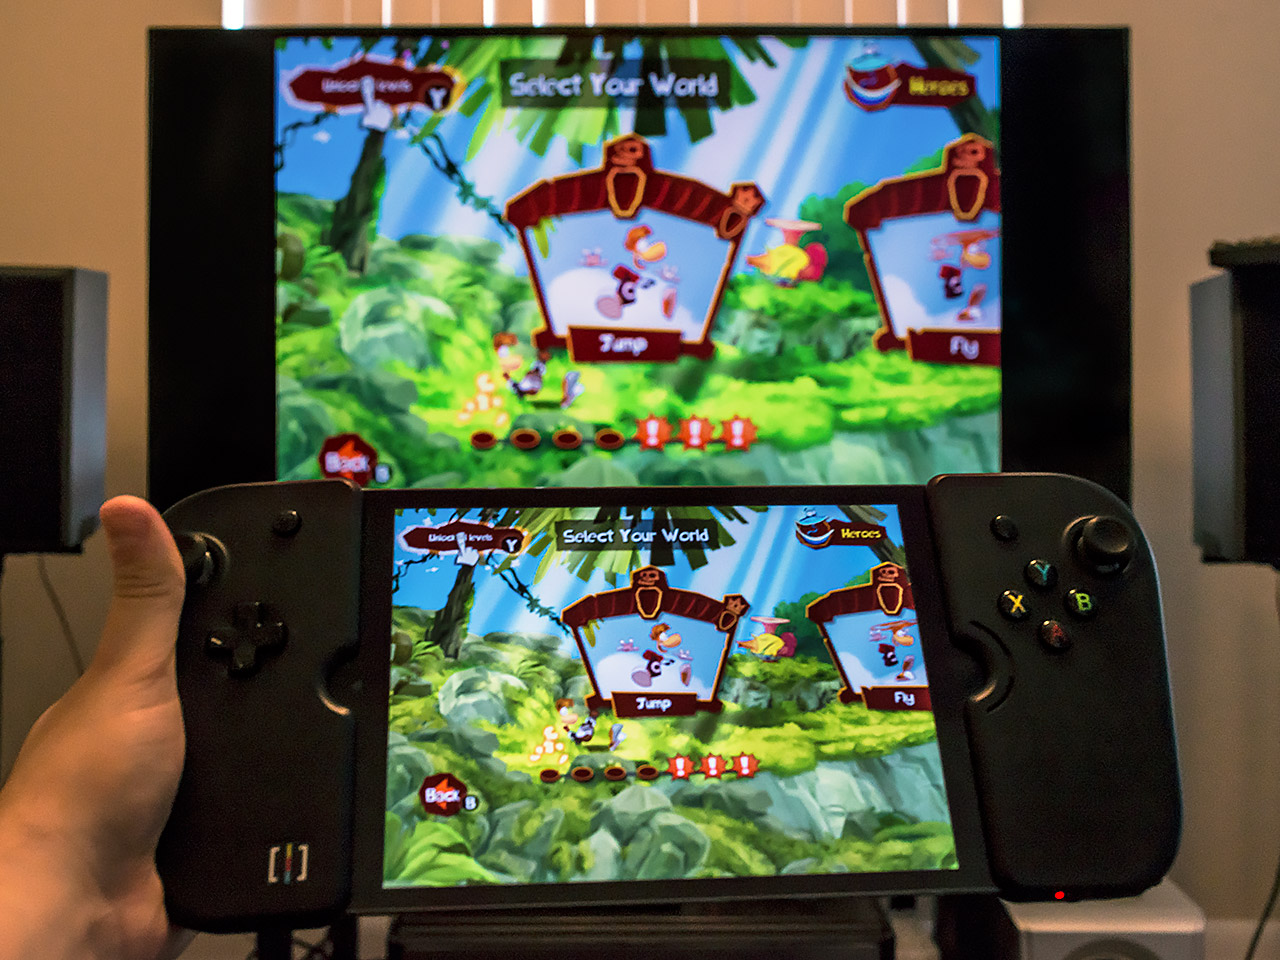

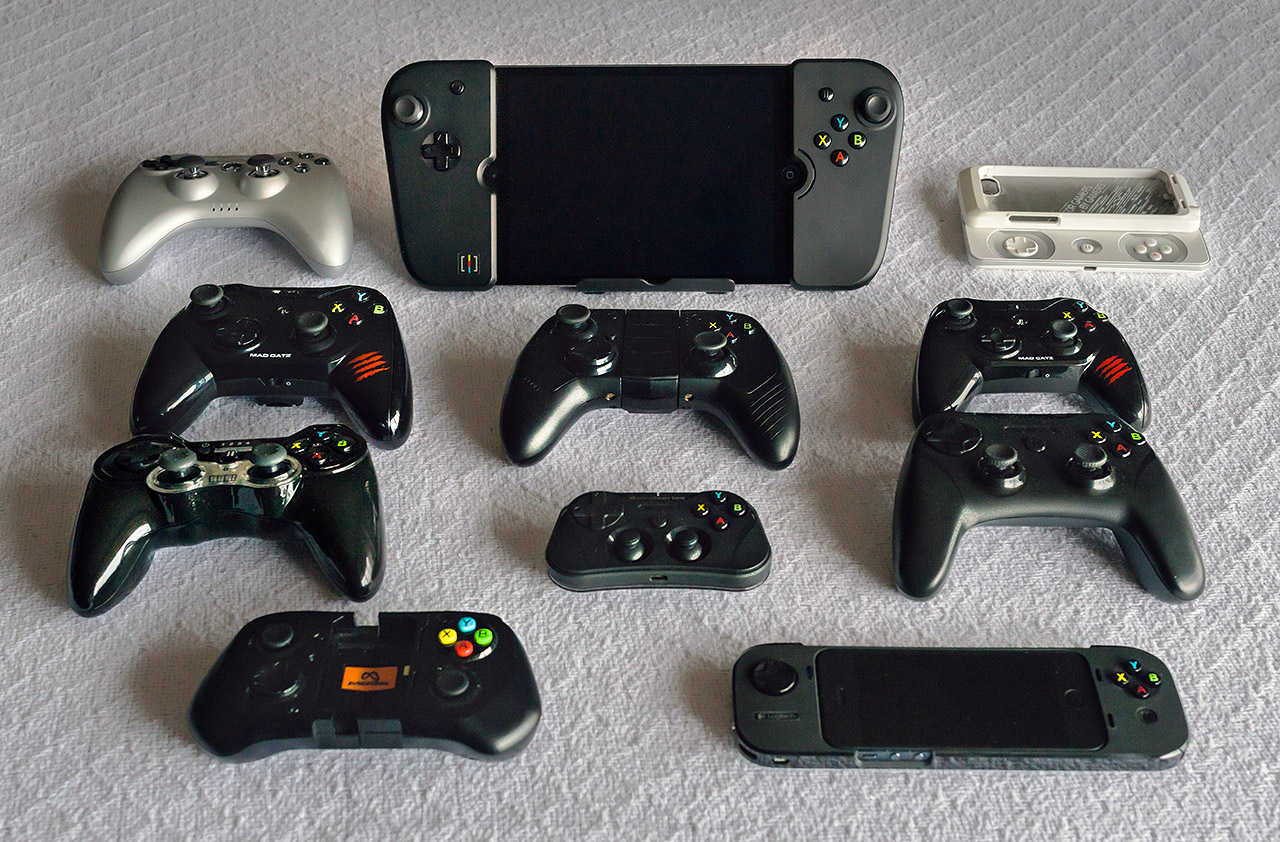


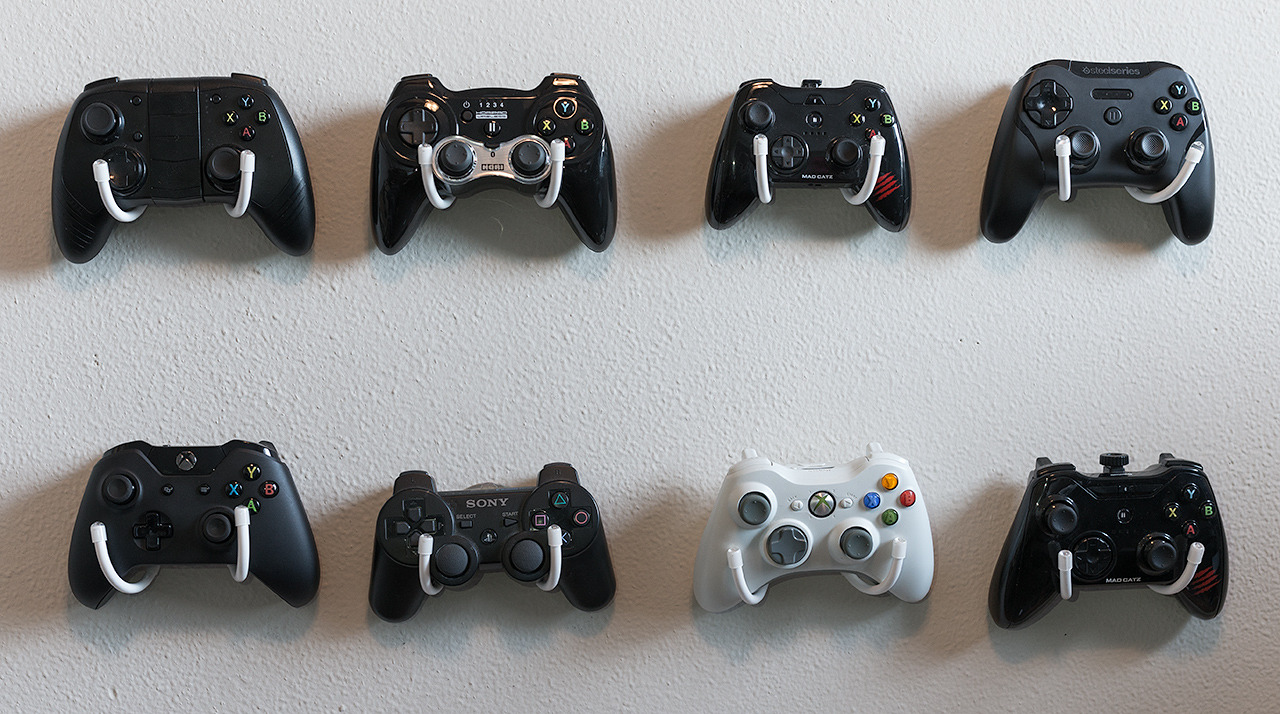 The Horipad, on my wall alongside a variety of other controllers